I am experiencing a new problem. I am printing small 4" x 6" labels and posters on phototex, and getting offset print happening on the black type just the text. SEE PIC. Both black and cyan printheads look good.
-
I want to thank all the members that have upgraded your accounts. I truly appreciate your support of the site monetarily. Supporting the site keeps this site up and running as a lot of work daily goes on behind the scenes. Click to Support Signs101 ...
You are using an out of date browser. It may not display this or other websites correctly.
You should upgrade or use an alternative browser.
You should upgrade or use an alternative browser.
Offset black type on my HP latex 315
- Thread starter depps74
- Start date


balstestrat
Problem Solver
What is the print direction? Did carriage move in the text direction?
Was there something around the text like pictures or else? It's important to know.
Was there something around the text like pictures or else? It's important to know.
MNT_Printhead
Working among the Corporate Lizard People
have you checked your file to see if the all of the text has the same color build?
What is the print direction? Did carriage move in the text direction?
Was there something around the text like pictures or else? It's important to knowtype is
type is horizontal so the printhead is oriented to print it left right. Put another way the printer is oriented to print it like a typewriter. There is an offwhite color in the backround and the file is an eps. Its a new problem but not a new job, been doing these types of prints for about 2 years.
yes its all one color black.have you checked your file to see if the all of the text has the same color build?
balstestrat
Problem Solver
Well then it's a momentary movement error.
Did you attach to take-up? Or did you move the material by hand, did it touch the floor, end of the roll, something else? Have you cleaned the OMAS window?
If you want you can turn off OMAS and do a manual feed calibration. That should solve it.
Did you attach to take-up? Or did you move the material by hand, did it touch the floor, end of the roll, something else? Have you cleaned the OMAS window?
If you want you can turn off OMAS and do a manual feed calibration. That should solve it.
what is best way to clean? Rubbing alcohol?Good suggestions...also clean the pinch rollers and main drive roller (all of it) to ensure that there are no contaminates on either surface.
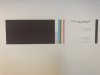
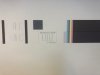
here are my recent alignment tests. NOt sure how to read these but they look good?Well then it's a momentary movement error.
Did you attach to take-up? Or did you move the material by hand, did it touch the floor, end of the roll, something else? Have you cleaned the OMAS window?
If you want you can turn off OMAS and do a manual feed calibration. That should solve it.
Attachments
balstestrat
Problem Solver
It doesn't have anything to do with your alignment because it works most of the time.
You need to go to substrate Library and modify the print mode you are using. There is advanced settings and OMAS option to turn it off. At the same place you need to introduce advance calibration value. That test you can find in the settings under image quality maintenance.
All this stuff is also in the user guide.
If I had to guess maybe that 3rd party take up of yours gave it a good pull or something, because that sort of thing made this error happen.
ok
ok thanks. I am running my machine off a laptop. I ordered a desktop at the advice of many, but just wondering if that might be causing any of these problmems?It doesn't have anything to do with your alignment because it works most of the time.
You need to go to substrate Library and modify the print mode you are using. There is advanced settings and OMAS option to turn it off. At the same place you need to introduce advance calibration value. That test you can find in the settings under image quality maintenance.
All this stuff is also in the user guide.
If I had to guess maybe that 3rd party take up of yours gave it a good pull or something, because that sort of thing made this error happen.
balstestrat
Problem Solver
No it won't cause this unless it keeps stopping during printing all the time.
Still, this is purely a material movement error.
Still, this is purely a material movement error.
RaymondLoewy
Pretty fly for a Sign Guy
You might try increasing your vacuum settings if you think the material might be lifting.
how do I adjust the vacuum settings?You might try increasing your vacuum settings if you think the material might be lifting.
balstestrat
Problem Solver
I still recommend the user guide to you. It's all explained there and do you know what is the best thing? It's free! No need to pay anyone.
Vacuum you can find in the same advanced settings menu I was talking about earlier.
Or when you print you have to go to the window that shows your job printing, time left etc. and there should be button to change some settings on the fly. Vacuum is one of them.
Vacuum you can find in the same advanced settings menu I was talking about earlier.
Or when you print you have to go to the window that shows your job printing, time left etc. and there should be button to change some settings on the fly. Vacuum is one of them.
RaymondLoewy
Pretty fly for a Sign Guy
Tap the picture of the job on the display and the next screen will have a "adjustments" button, hit that and you have vacuum settings with others that can also be changed.
balstestrat
Problem Solver
It's a little different on L315 as it has smaller screen. Sort of same path tho.Tap the picture of the job on the display and the next screen will have a "adjustments" button, hit that and you have vacuum settings with others that can also be changed.
Christian @ Visual Graphx
Active Member
I'm surprised no one mentioned this yet, but what is your ink density? After printing on phototex and other fabrics for year's, that inconsistent haloing is actually the ink bleeding into the fabric. It can be solved by reducing the ink density.
Being a fabric product the fibers can draw ink into them. I bet if you print the same file and same profile on a vinyl substrate you will get different results.
Being a fabric product the fibers can draw ink into them. I bet if you print the same file and same profile on a vinyl substrate you will get different results.
how do you adjust the ink density? I am in the profile menu but those options are greyed out.I'm surprised no one mentioned this yet, but what is your ink density? After printing on phototex and other fabrics for year's, that inconsistent haloing is actually the ink bleeding into the fabric. It can be solved by reducing the ink density.
Being a fabric product the fibers can draw ink into them. I bet if you print the same file and same profile on a vinyl substrate you will get different results.