• I want to thank all the members that have upgraded your accounts. I truly appreciate your support of the site monetarily. Supporting the site keeps this site up and running as a lot of work daily goes on behind the scenes. Click to Support Signs101 ...

Question on - How to move a printer?

96XP

New Member
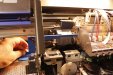
Am in the process of moving to a new location and have two Roland printers to truck for four hours.
(SC-540 and SP-300v)
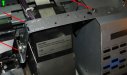
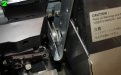
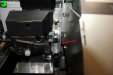
There are no keys or brackets with my machines to lock the print head stations in place, so am wondering what I must guard for and what method I can use or do to keep them stable during transport without those parts.

Also, is it the vertical, or horizontal movement I need to prevent - or both? And will I need to add some padding between the base of the printer and enclosed truck bed to prevent vibrations?

Detailed advice in the moving procedure will be greatly appreciated.
 

balstestrat

Problem Solver
Just to make sure, have you checked under the printer the usual spot where the bracket is skrewed to when not used?

We have transported tens of rolands just locking the head into place and secure to the truck. Nothing else needed if you don't have the dummies to replace cartridges.
 

Texas_Signmaker

Very Active Signmaker
I strapped a 540v inside a moving van... stand and all and drove through Oklahoma. It went fine but looking back that probably wasn't the safest move.
 

96XP

New Member
Just to make sure, have you checked under the printer the usual spot where the bracket is skrewed to when not used?

We have transported tens of rolands just locking the head into place and secure to the truck. Nothing else needed if you don't have the dummies to replace cartridges.

Didn't come with either - nothing on the machine to be found. As for cartridges, I've modified some 440cc empty tanks. I trim them short like a 220, then fold the bag inside the balance, this way they wouldn't protrude. Which bring me to another question: How about remaining ink in the lines? Do I need to flush them back, and if so, what method? I was also considering removing each damper (12) and injecting cleaning fluid through the manifolds. Good idea or bad?
 

96XP

New Member
Found this bracket, but really can't figure out if it's what I need, or even how it would attach. Other pic is of the shortened 440 tank with bag folded in.
 

Attachments

  • _MG_6462.JPG
    _MG_6462.JPG
    106.6 KB · Views: 182
  • _MG_6458.JPG
    _MG_6458.JPG
    157.3 KB · Views: 187
  • _MG_6459.JPG
    _MG_6459.JPG
    131.9 KB · Views: 201
  • _MG_6460.JPG
    _MG_6460.JPG
    188.2 KB · Views: 198

Jim Hancock

Old School Technician
If I remember correctly, the grooves in the bracket fit the "flanges" on the cut and print carriages where they connect magnetically. If you position the bracket correctly, the slot in the bracket will line up with a corresponding hole in the frame, either the platen or the head carriage frame. This will keep both parts locked in place. No need to do anything to the ink system for that short period of time. They won't be off long enough to be concerned about the ink. Putting the modified 440 carts in the ink bays should work very well - nice idea! Dampers should be fine. Putting thick foam blocks under the printers to absorb road vibrations and bumps is a good idea and strapping them down with foam between the printers and the truck wall is also a good plan. That should minimize vibrations enough.
 

96XP

New Member
If I remember correctly, the grooves in the bracket fit the "flanges" on the cut and print carriages where they connect magnetically. If you position the bracket correctly, the slot in the bracket will line up with a corresponding hole in the frame, either the platen or the head carriage frame. This will keep both parts locked in place. No need to do anything to the ink system for that short period of time. They won't be off long enough to be concerned about the ink. Putting the modified 440 carts in the ink bays should work very well - nice idea! Dampers should be fine. Putting thick foam blocks under the printers to absorb road vibrations and bumps is a good idea and strapping them down with foam between the printers and the truck wall is also a good plan. That should minimize vibrations enough.

If I remember correctly, the grooves in the bracket fit the "flanges" on the cut and print carriages where they connect magnetically. If you position the bracket correctly, the slot in the bracket will line up with a corresponding hole in the frame, either the platen or the head carriage frame. This will keep both parts locked in place. No need to do anything to the ink system for that short period of time. They won't be off long enough to be concerned about the ink. Putting the modified 440 carts in the ink bays should work very well - nice idea! Dampers should be fine. Putting thick foam blocks under the printers to absorb road vibrations and bumps is a good idea and strapping them down with foam between the printers and the truck wall is also a good plan. That should minimize vibrations enough.

Found it, (actually the wife found it) - dumb me...
That bracket fits the 54", so I'll make something up for the 30".
Thanks to everyone here who offered advice :)
 

96XP

New Member
This is a followup post.

We traveled for 4.5 hrs through windy and sometimes bumpy roads. The SC-545EX was removed from the base and strapped to the side of the inside of a 26ft U-Haul. It rested on wooden handle (made) that were built to lift the printer on and off the base. I'll post pictures at some point as they work quite well for handling the unit.
The SC only needed to be re-calibrated once setup in it's new home.

The Sp 300-v didn't come with a locking armature for the heads, so had to improvise. A metal part was acquired from home Depot, then bent just a few short times to fit the application and fastened to the printer as seen in image #1.
Images #2 and 3 are self explanatory.
It was then loaded onto the truck, though still mounted on the stand, then strapped to the wall with some padding behind.
However on first boot-up, there was a terrible sound, sort of like a loud friction.

Had to open up the unit to find the source and noticed the gasket (image #4) had shifted and what I was hearing was from the fan rubbing on it.
Didn't take much to make the adjustment - just a simple finger push.

But when I was removing the front lower metal cover, the two wire leads had broke off from the Thermistor. Soldered them back on and used shrink tube. Error code gone and booted fine with minor calibration.

All in all, these machines are better designed (and tougher) than I had expected, particularly of the rough ride at times.
And I'd be lying if I said I didn't break a sweat over it.

Hope this is helpful to someone, someday in the future.
 

Attachments

  • 2.jpg
    2.jpg
    136.2 KB · Views: 181
  • 4.jpg
    4.jpg
    124.6 KB · Views: 180
  • 3.jpg
    3.jpg
    99.6 KB · Views: 174
  • 1.jpg
    1.jpg
    123.4 KB · Views: 172

netsol

Premium Subscriber
i guess i dropped the ball and never replied to you, before your move.
the sc545 is a fairly rugged machine and easy to move, except for the weight of the thing.

the worst machine to move are the gerber edhe, since they have a ceramic head, and require a transport bracket for protection. (think of moving a box of your grandmother's christmas ornaments)

our rolands have always survived fairly well after transport

you may find the need for a few adjustments in the next few days, but it sounds like you did great.

we moved our sc545ex back in may, i splurged and rented a lift gate truck.
it had previously been moved with a uhaul, with a ramp,but, i am 66 now and it is kind of heavy. the lift gate paid off, since we were moving 3 54" rolands, 2 daige laminators, a seal 44" laminator , a royal sovereign 65" and a stratasys 3d printer (450 lbs) as well
 

96XP

New Member
Was the second move on the 545 netsol, and learned after the first that it needed handles or something. Attached are images of those I made up for this purpose. Glued and screwed for strength, and a rubber platform liner to prevent sliding. It's just high enough off the ground to grasp the handles, and to set on the base and slide out between the bottom of the printer and the stand. Easy on - Easy off. Ther are two in the set - one for each end.
 

Attachments

  • _MG_6488.JPG
    _MG_6488.JPG
    181.7 KB · Views: 160
  • _MG_6485.JPG
    _MG_6485.JPG
    123.5 KB · Views: 169
  • _MG_6487.JPG
    _MG_6487.JPG
    94.9 KB · Views: 140
Top