• I want to thank all the members that have upgraded your accounts. I truly appreciate your support of the site monetarily. Supporting the site keeps this site up and running as a lot of work daily goes on behind the scenes. Click to Support Signs101 ...

Rate my very first sign

Mr.Ry

New Member
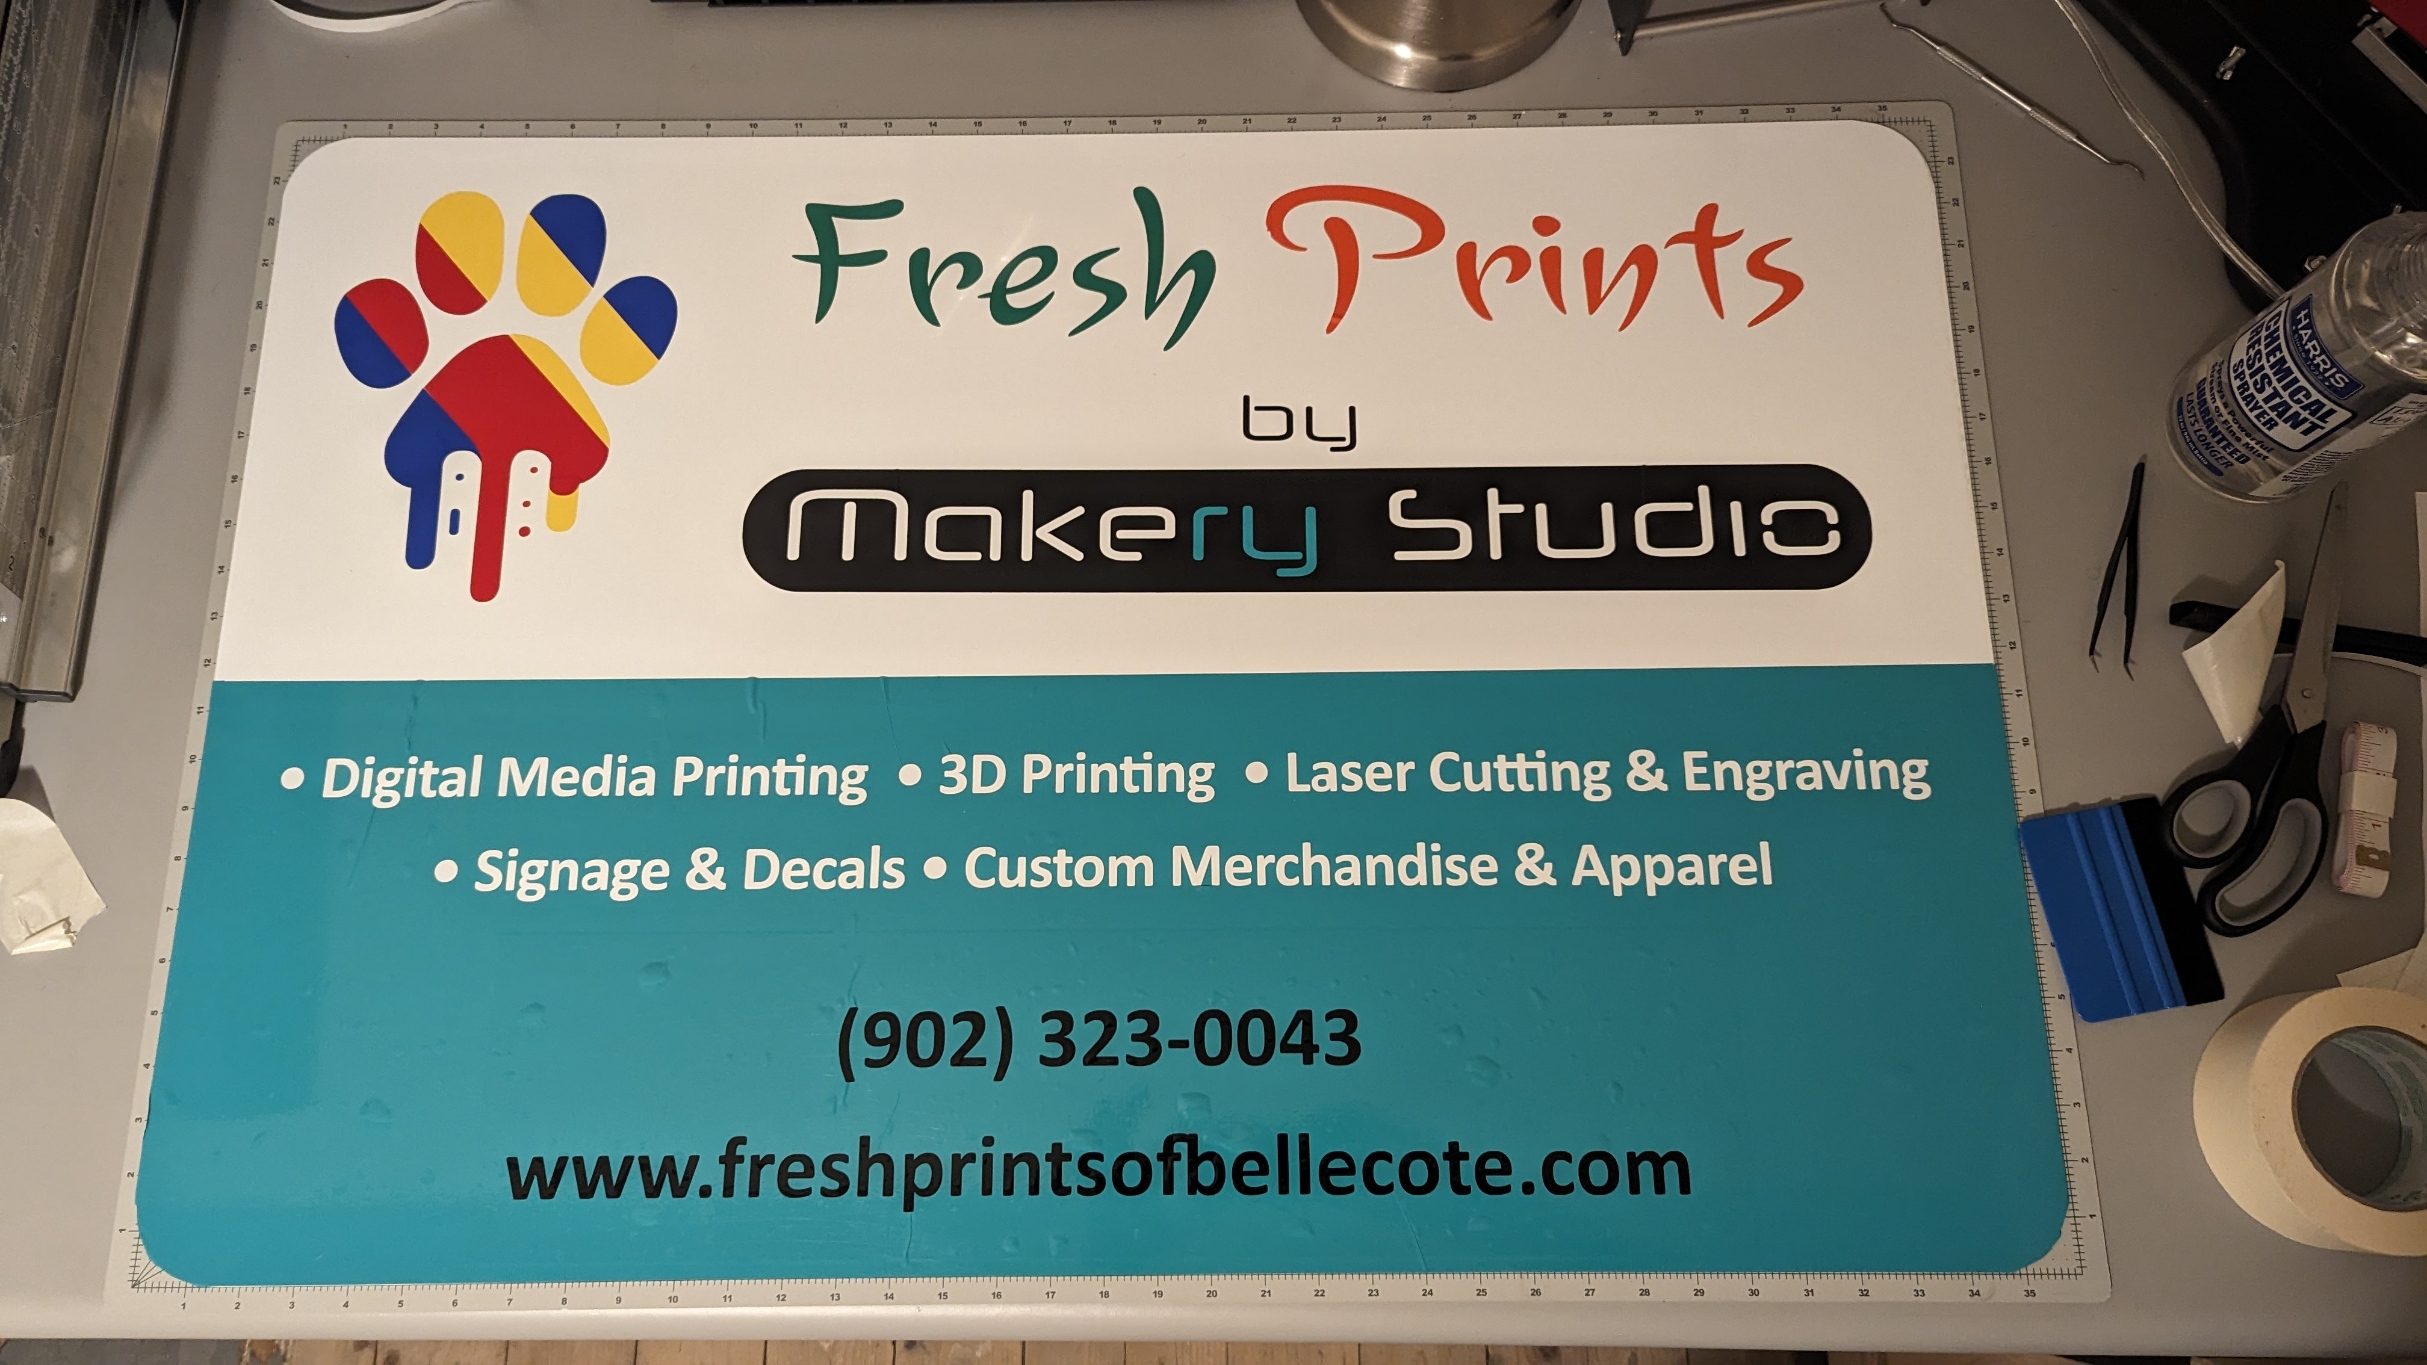
Hey everyone. I introduced myself here recently as being a brand business owner that's new to the sign making industry with nearly no experience. I just finished designing and working on my very first sign, which is for my own business, and so I thought I'd post a pic up here for any feedback and critique anyone is willing to offer.

This is intended to be a highway road sign that I'll be putting up on my property, though I don't yet have a specific plan on that part as of yet. Most of the media used is a garbage quality stuff from Amazon (brand called Vivid. I'm sure I don't need to tell you guys to avoid this crap) with some Oracal 651. Backing is a 24x36 aluminum sign blank.

It's not 100% perfect, so I'll list off the issues that are known to me:

1) The "by Makery Studio" part is crooked
2) Air bubbles and some minor creases in the turquoise lower half. This was due to the crappy media already having air bubbles in it's own backing that I couldn't eliminate and got transferred.

Any suggestions how to adjust the crooked part easily or get those air bubbles/creases out? Will using a heat gun help, or will that cause any warping or shrinkage?

So... what do you guys think?

fresh-prints-by-makery-studio-first-sign-jpg.171821
 

Attachments

  • Fresh Prints by Makery Studio - First sign.jpg
    Fresh Prints by Makery Studio - First sign.jpg
    1 MB · Views: 1,164

Gino

Premium Subscriber
I'll wait til I see some more of your stuff to make a more accurate assessment.
 

Boudica

I'm here for Educational Purposes
I think you have bubbles in the teal vinyl. Why did you only cover half with vinyl?
 

Mr.Ry

New Member
Thanks for all of the honest feedback so far. I appreciate all of it, the more critical ones will push me to do better and the positive ones tell me what I'm doing right and gives me hope I'm on the right track! I absolutely will be redoing this sign, I simply didn't have the color selection on hand of any professional grade media, but I'll be ordering what I need to do this proper next.

I think you have bubbles in the teal vinyl. Why did you only cover half with vinyl?

Yeah, I mentioned the bubbles as issue #2 in my OP, so you're definitely right about that.

I only covered the bottom half with vinyl because my business logo, which is the top half, uses a white background. I figured that it would simplify things to not use white vinyl, but instead to leave the substrate naked for that instead. Even the white lettering on the bottom is the substrate showing through cutout letters in the teal.

So, newbie question time: is that wrong? Should every inch of a sign be covered in vinyl?
 

weyandsign

New Member
Get a longer squeegee it will help you have less bubbles. If you use the hinge method (masking tape down the center, stick half the decal on at a time) you shouldn't have problems getting it on straight.
 

Boudica

I'm here for Educational Purposes
I would say - if you offer digital media printing like it says on your sign, that is how you should produce your sign. Print/laminate the whole graphic, and mount it to the substrate. This would eliminate individual elements being crooked - you only have to align the entire graphic. get a squeegee like weyandsign suggested - and the center hinge tip as well.
 

SightLine

║▌║█║▌│║▌║▌█
Layout is not terrible. Not a bad start for a first timer. The mistakes are really all just in install techniques. Even with the crap vinyl you could have gotten that on without wrinkles, bubbles, and perfectly straight. Just need to get some experience and learn some techniques. Typically if I use dots as dividers I will not add them on new lines at the start, only in between.
 

Solventinkjet

DIY Printer Fixing Guide
So, newbie question time: is that wrong? Should every inch of a sign be covered in vinyl?
I worked in a sign shop before outdoor durable inks were a thing and the way you made this sign is the way we made all of our signs. These days with outdoor inks, it's much less common but not obsolete. Printing the whole thing and applying it with a laminator is so much more efficient that most of your signs should be printed in my opinion. That being said, cut vinyl is still useful for colors you can't print, cheap yard signs, and other simple signs. At the end of the day it's a business. You don't really want to be spending most of your time weeding and aligning when your competitors are pumping out signs 4 times faster than you.
 

Stacey K

I like making signs
I don't think the layout is terrible. I'm not a real fan of all the colors in your logo. Can the footprint maybe be one color? IDK. I do like how the logo is on top and the other items on the bottom. Signtline is right - ditch the bullets in front of the item lines when you center them. Others stated advice for application and they are correct.

From your website, it looks like you do quite a variety of things, your 3D printing is cool! I like the photos with the blue background, they look a bit more professional. Perhaps you can remove the background on some of the others and add a blue background, just a thought. I get the feeling much of these photos were taken in your house which is fine, but the blue background ones give a bit more of a professional look.
 

gnubler

Active Member
Get a longer squeegee it will help you have less bubbles. If you use the hinge method (masking tape down the center, stick half the decal on at a time) you shouldn't have problems getting it on straight.
And also pull your transfer tape off at an 180 degree angle, slowly. Removing it too fast and with an upward pull can the vinyl to lift and cause bubbles.
 

Notarealsignguy

Arial - it's almost helvetica
I'd center up those bullets and get that spacing uniform, little details. Fresh prints also looks far from the by markery studios, both elements kinda hanging on their own IMO.
 

gnubler

Active Member
Layout is not terrible. Not a bad start for a first timer. The mistakes are really all just in install techniques.
Practice makes perfect...or not, in my case. Check out my pile of rage from last summer when I was trying to make vehicle magnets with a metallic silver background. Bubbles, bubbles, bubbles. I wasted so much material until I figured out the magic trick, which is posted somewhere here on the forum.

20230728_120723.jpg
 

Boudica

I'm here for Educational Purposes
Practice makes perfect...or not, in my case. Check out my pile of rage from last summer when I was trying to make vehicle magnets with a metallic silver background. Bubbles, bubbles, bubbles. I wasted so much material until I figured out the magic trick, which is posted somewhere here on the forum.

View attachment 171830
I remember this pile of rage! :p
 

Mr.Ry

New Member
Again, so many helpful and awesome responses. It's hard to keep track of all the points I want to respond to myself, but thanks again for all the comments.

I would say - if you offer digital media printing like it says on your sign, that is how you should produce your sign. Print/laminate the whole graphic, and mount it to the substrate. This would eliminate individual elements being crooked - you only have to align the entire graphic. get a squeegee like weyandsign suggested - and the center hinge tip as well.
I worked in a sign shop before outdoor durable inks were a thing and the way you made this sign is the way we made all of our signs. These days with outdoor inks, it's much less common but not obsolete. Printing the whole thing and applying it with a laminator is so much more efficient that most of your signs should be printed in my opinion. That being said, cut vinyl is still useful for colors you can't print, cheap yard signs, and other simple signs. At the end of the day it's a business. You don't really want to be spending most of your time weeding and aligning when your competitors are pumping out signs 4 times faster than you.

Grouping these two together since they both mention about printing and laminating, so time for another round of some newbie questions related to that.

For starters, I assume by printing you are referring to printing on printable vinyl, correct?
I have an entry level wide-format printer, but it only works with paper media, and I'm assuming that even with lamination the paper media wouldn't cut it for signage. Is that a correct assumption, or is this totally possibly with coated photo paper and proper lamination?

Does sign lamination require a heated laminating press, or can cold laminate suffice in some cases? I picked up a cold press laminator a while back, though I haven't explored using it as of yet.
I have looked into heated laminators, however those appear to be out of reach in terms of cost and space practicality reasons. I didn't mention in my OP, but I'm operating out of unused space in my home, which obviously puts some limits on things like equipment.

Assuming I'm correct on my, uhh, assumptions above (realizing I sure am doing a lot of ASSuming here), and if I need to consider adding both vinyl printing and heated laminate solutions to my capabilities can anyone make any recommendations for what would be solid entry level choices to consider, that magically won't be too expensive and won't ask for a massive footprint? While you're at it, can anyone tell me where to find a unicorn? :big laugh:
 

Solventinkjet

DIY Printer Fixing Guide
Again, so many helpful and awesome responses. It's hard to keep track of all the points I want to respond to myself, but thanks again for all the comments.


Grouping these two together since they both mention about printing and laminating, so time for another round of some newbie questions related to that.

For starters, I assume by printing you are referring to printing on printable vinyl, correct?
I have an entry level wide-format printer, but it only works with paper media, and I'm assuming that even with lamination the paper media wouldn't cut it for signage. Is that a correct assumption, or is this totally possibly with coated photo paper and proper lamination?

Does sign lamination require a heated laminating press, or can cold laminate suffice in some cases? I picked up a cold press laminator a while back, though I haven't explored using it as of yet.
I have looked into heated laminators, however those appear to be out of reach in terms of cost and space practicality reasons. I didn't mention in my OP, but I'm operating out of unused space in my home, which obviously puts some limits on things like equipment.

Assuming I'm correct on my, uhh, assumptions above (realizing I sure am doing a lot of ASSuming here), and if I need to consider adding both vinyl printing and heated laminate solutions to my capabilities can anyone make any recommendations for what would be solid entry level choices to consider, that magically won't be too expensive and won't ask for a massive footprint? While you're at it, can anyone tell me where to find a unicorn? :big laugh:
A lot of people just starting out will sub out all printing to someone like Firesprint or Signs365. They will print and laminate it for you at wholesale prices. Then you can focus on building the business, designing, installing, and when the time comes to grow, you can get your own equipment. That sounds like where you're at right now.

The printer is all about the ink it uses. You want something that prints solvent, latex, or UV cured ink for good outdoor durability. If your ink is water based or is described as "dye" it won't do well outdoors. Most sign laminate these days is pressure sensitive so no super hot laminator needed. You can also use a laminator as a mounting machine as well which will help you with those bubbles, especially on large jobs.
 
Top