That is a good troubleshooting technique to narrow down the issue. But, after switching the dampers, did you do a cleaning, preferably a medium cleaning to flush the other color inks from the head? If the test print done after this is K/C, but physically where the M/Y normally is, then you have verified the print head is good.
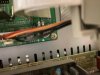
As several have said and your pictures show, you have an obvious issue with air in the magenta line. I would suggest the following:
Get several of these -
https://www.solventinkjet.com/product-page/10ml-tapered-syringe
Make sure the nut attaching the ink line is very tight. Did you replace the O-ring, as has been suggested? If you don't have any, then you can get these -
https://www.solventinkjet.com/product-page/2mm-o-ring-pack-of-5
Use the above syringe to pull ink through the damper until you have the air out of the line and the damper is full. I hold the damper upside down while doing this to get most of the air out of the damper. It isn't necessary to get all the air out of the damper, having it 3/4 quarters full of ink is satisfactory.. Once you think you have done that, empty the syringe and pull a little more ink, watching the thin channel in the damper for any air bubbles. If there are no bubbles, then put the dampers back in their correct locations, and do at least a medium clean, and a test print. If you still have no M/Y in the test print or a crummy test print in the M/Y, then you need to look at the capping alignment.
Please let us know...