• I want to thank all the members that have upgraded your accounts. I truly appreciate your support of the site monetarily. Supporting the site keeps this site up and running as a lot of work daily goes on behind the scenes. Click to Support Signs101 ...

Need Help Roland VS540i, Brand New Printhead Zero Nozzles firing after installing

Myster Enigma

New Member
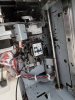
Hi Guys, So I have an issue with my VS540i. So my old printhead has been leaking whilst idle. Ink droplets would just drip from the printhead whilst nothing was happening. I've noticed this when I did a manual clean as I could see under the printhead. As well as this the printhead will often get intermittent drop outs in the nozzles, one line of black and one line of yellow will completely drop out and head cleans can fully restore them.

But eventually they dropped out again. I thought I'd change a few parts first such as the captop (No difference) and then the dampers. Initially I made a mistake and installed the dampers the wrong way round :( So when it was installed incorrectly I ran a fill ink and ink was flowing through the lines but the nozzle did not fire any ink at all. At this point I did not know the dampers were inserted incorrect. So I bought a new genuine printhead (DX7) and installed it. Again the dampers were the wrong way so nothing fired.

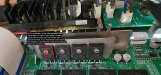
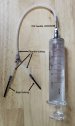
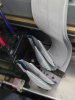
I took it all apart and then realised the dampers were put in wrong. So I turned all the dampers around so they are now facing the correct side. I had one spare so I actually discard one and used a new one for yellow and magenta. I primed the dampers using a syringe and pulled back in both outlet holes. I did this to all the dampers. I then installed the new printhead again, did a fill ink via the service menu. Ran a nozzle check and unfortunately still not a drop of ink from the nozzle test.

I decided to reinstall the dampers one at a time instead of pulling the printhead cover off with it. I closed the choke valve and this this. After installing there were some air in the lines so I ran fill ink (After reopening the choke valve). I could see the ink flowing back into the head. After it was done I did a nozzle check. Again absolutely nothing

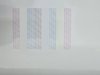
I wanted to make sure that the ribbon cables haven't been affected so I installed a different printhead from my old BN20. This head had bad nozzles but it was working. I installed it and it printed a pattern (very bad but showed something) now this was the residual ink because I ran one head clean then there wasn't any pattern at all.

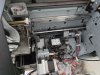
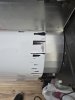
I tried to syringe from the captop's ink tubes but no ink is flowing and there is little resistance. My next step is to change the captop and I am awaiting this. As you can see from the photos, my old printhead was leaking. I syringe filled the captop with some eco solvent cleaner to soak it. So everytime I run a nozzle check the printhead will smear this black mark across the media.

If it's not the captop do you have any idea of what it may be? As I am now struggling with this and feel quite depressed from it
 

Attachments

  • 20250813_133610.jpg
    20250813_133610.jpg
    971.8 KB · Views: 14
Last edited:

Jim Hancock

Old School Technician
Not sure what you mean by installing the dampers the wrong way. FYI, these dampers are double dampers and it doesn't matter which way they are facing as long as the up-down orientation is correct, which is impossible to mess up, as the spacing of the holes on the dampers is different on the top and bottom. If you have ink going through the head, which you will see in the cap during cleaning cycles, then your issue is electronic. To start, you need to use a multimeter to check the fuses F1 & F2 and the transistors on the main board. I've attached a pic on how to read the transistors. The pic is from a different printer, but the way to read them is the same.
 

Attachments

  • Transistor readings.jpg
    Transistor readings.jpg
    236.4 KB · Views: 12
  • Agree
Reactions: 1 user

Myster Enigma

New Member
Not sure what you mean by installing the dampers the wrong way. FYI, these dampers are double dampers and it doesn't matter which way they are facing as long as the up-down orientation is correct, which is impossible to mess up, as the spacing of the holes on the dampers is different on the top and bottom. If you have ink going through the head, which you will see in the cap during cleaning cycles, then your issue is electronic. To start, you need to use a multimeter to check the fuses F1 & F2 and the transistors on the main board. I've attached a pic on how to read the transistors. The pic is from a different printer, but the way to read them is the same.
Firstly thank you so much for the response as I wasn't sure if I would even get a reply so honestly this has made my day :) In terms of the dampers it's not that I put them upside down but I thought I had installed them facing the wrong way e.g 2 metal looking filters facing the right. I replaced these whilst looking at the service menu. I'm glad that you can orientate them both ways. I was confused because I recently bought a BN20 which had a bad head and I replaced it. In the video the person stated that the damper needs to be placed in such a way, he did not state it was a 2 way damper. Thank you for clearing that up. Yes I am seeing ink go into the waste ink tank. But as for the cap top I can't draw any ink from those tubes. I read that you should be able to draw ink from the cap station tubes whilst the printhead is parked but it seems to just be air. Does it matter which tube I syringe from as there are 2? But I will definitely buy a multimeter to check the fuses as well.

As I used a bad head to test previously and it was able to print a slight pattern due to residual ink, can the fuses still be bad?

Thank you I will buy a multimeter now
 

Attachments

  • Dampers.jpg
    Dampers.jpg
    176.2 KB · Views: 10

Jim Hancock

Old School Technician
Based on your pic, I don't think it printed anything with the old head. It looks more like ink dripping getting smeared.

Multimeter -
Amazon - https://www.amazon.com/AstroAI-Digital-Multimeter-Voltage-Tester/dp/B01ISAMUA6/ref=sr_1_1_sspa?crid=1UIOZBEBY86XC&dib=eyJ2IjoiMSJ9.yVChUu6urm0P5GzWYXOJJKKjtYeRkXPCgYaxbOwUJ1HOLG2T-2yYUQbR-YlF-m4IkIsTdYNs24SvXO6tF7JhX-Nfktc7CdFO7DgRsPE2xToF5MMUCtnpZCsckWzvBSnJ2AYPRXXDtk0xEsTSdqAgUOszeSH3VXt1jg2gtClDz5HQroAotCsiFYBIxw1sL4aqpjaNC_ImBKOYASWpBZrSCb9SajLfJvbSz6H0qQ-Y13ODKI3wmCivZ6XnY1kj2k9iNaAHrp9MK5nOWor9TvM5DtYC_ceYLwGneeweA1Vli8Q.uVizhldHv9oQ1K7pn-xtA3o0It5tPHyeY_59oRf9ZHU&dib_tag=se&keywords=multimeter&qid=1755104649&sprefix=multimeter,aps,195&sr=8-1-spons&sp_csd=d2lkZ2V0TmFtZT1zcF9hdGY&th=1

Home Depot - https://www.homedepot.com/p/Commerc...Ranging-Digital-Multimeter-DMM-8301/329388201

When trying to pull ink through the cap, always pull very gently. As this printer uses hard tubing from the cap to the pump, you can't really close off the second line, so you will need to pull from both lines at the same time. See below for the ink pulling rig I use. You are likely pulling air through the second line at the moment. For your printer, you won't use the rigid tubing in the pic. Attach the 2 flexible tubing legs to the 2 lines from the cap. Also, as this type of tubing has a tendency to permanently expand where it is attached to the bottom of the cap, I would suggest you cut off 1/8 inch of the tubing and reattach them to the cap. This will insure you don't have an air leak at the bottom of the cap.

Ink pulling rig -
https://www.signs101.com/threads/1s...deos-but-have-a-question.180737/#post-1675840

See post #12 for what you need.
 

Attachments

  • Ink pulling setup.jpg
    Ink pulling setup.jpg
    107.6 KB · Views: 4

Myster Enigma

New Member
Based on your pic, I don't think it printed anything with the old head. It looks more like ink dripping getting smeared.

Multimeter -
Amazon - https://www.amazon.com/AstroAI-Digital-Multimeter-Voltage-Tester/dp/B01ISAMUA6/ref=sr_1_1_sspa?crid=1UIOZBEBY86XC&dib=eyJ2IjoiMSJ9.yVChUu6urm0P5GzWYXOJJKKjtYeRkXPCgYaxbOwUJ1HOLG2T-2yYUQbR-YlF-m4IkIsTdYNs24SvXO6tF7JhX-Nfktc7CdFO7DgRsPE2xToF5MMUCtnpZCsckWzvBSnJ2AYPRXXDtk0xEsTSdqAgUOszeSH3VXt1jg2gtClDz5HQroAotCsiFYBIxw1sL4aqpjaNC_ImBKOYASWpBZrSCb9SajLfJvbSz6H0qQ-Y13ODKI3wmCivZ6XnY1kj2k9iNaAHrp9MK5nOWor9TvM5DtYC_ceYLwGneeweA1Vli8Q.uVizhldHv9oQ1K7pn-xtA3o0It5tPHyeY_59oRf9ZHU&dib_tag=se&keywords=multimeter&qid=1755104649&sprefix=multimeter,aps,195&sr=8-1-spons&sp_csd=d2lkZ2V0TmFtZT1zcF9hdGY&th=1

Home Depot - https://www.homedepot.com/p/Commerc...Ranging-Digital-Multimeter-DMM-8301/329388201

When trying to pull ink through the cap, always pull very gently. As this printer uses hard tubing from the cap to the pump, you can't really close off the second line, so you will need to pull from both lines at the same time. See below for the ink pulling rig I use. You are likely pulling air through the second line at the moment. For your printer, you won't use the rigid tubing in the pic. Attach the 2 flexible tubing legs to the 2 lines from the cap. Also, as this type of tubing has a tendency to permanently expand where it is attached to the bottom of the cap, I would suggest you cut off 1/8 inch of the tubing and reattach them to the cap. This will insure you don't have an air leak at the bottom of the cap.

Ink pulling rig -
https://www.signs101.com/threads/1s...deos-but-have-a-question.180737/#post-1675840

See post #12 for what you need.
Again thank you so much for your response. I went ahead and purchased the multimeter from your Amazon link :) In the pic I shared that ink is the residue from the capping station. My previous printhead was leaking from the nozzles and I believe it had saturated the capping station when it was parked. This is the reason I replaced the printhead. I replaced the capping station first but now this new one is saturated again so all I did this time was pour around 5ml of Eco solvent cleaner into the cap station and it seems to keep smearing the printhead when I run a nozzle check. Also thanks for the detailed photos of the ink pulling rig as this helps a lot. I will do this as well and follow your instructions and report back. Again thank you so much for your detailed explanations.
 

Jim Hancock

Old School Technician
You are welcome! In the meantime, keep the heads wet by doing a head soak. Power off and unplug the printer. Because of these lines being hard tubing, this is probably the easiest way to do this. Undo the wire saddles retaining the 2 cap lines. Lift them up high enough so they are above the level of the cap and tape them in place. You can now fill the cap up brimming full with cleaning solution and it shouldn't drain out. Park the head. This will protect the head from drying out.
 

Myster Enigma

New Member
You are welcome! In the meantime, keep the heads wet by doing a head soak. Power off and unplug the printer. Because of these lines being hard tubing, this is probably the easiest way to do this. Undo the wire saddles retaining the 2 cap lines. Lift them up high enough so they are above the level of the cap and tape them in place. You can now fill the cap up brimming full with cleaning solution and it shouldn't drain out. Park the head. This will protect the head from drying out.
Thank you. Yes I will do that. In terms of the new head drying out on the 2nd day of having it I did take it out of the machine and put it back in the plastic retail box. I left the old head in the printer. Today I put the new head back in the machine. Do you think it would have dried out by now? I am hoping that the new printhead won't have any issues already :(
Thanks
 

cornholio

New Member
I little thing to add.
The orientation of the dampers should be the same. Otherwise the membranes from two adjacent dampers touch each other.
 
Top