Hello,, I know this is a dumb question but I really don't know why when I put down lets say 18" application tape , I most of the time get wrinkles. If I do it with the big squegee it will usually work but when I have my wife hold the roll at one end and I start laying it down working toward her , it begins to wrinkle. Do you think maybe it is to tight? The reason I don't use the big squgee more is because it is hard to line up and I will usually end up running off the vinyl. I don't know, but I would love some advice. Thanks for any help. Paul
-
I want to thank all the members that have upgraded your accounts. I truly appreciate your support of the site monetarily. Supporting the site keeps this site up and running as a lot of work daily goes on behind the scenes. Click to Support Signs101 ...
You are using an out of date browser. It may not display this or other websites correctly.
You should upgrade or use an alternative browser.
You should upgrade or use an alternative browser.
Secret to putting down application paper
- Thread starter shuv76
- Start date
CheapVehicleWrap
New Member
do it upside down
Brandon708
New Member
MikePro
Active Member
application tape on rollers mounted to the table... i can mask the whole length of my 16' workbench with 48", and there's room under the rollers to slide already masked sheets... and keep the web going, if necessary! Longest ever has been 48"x 30', solo, but now I just use my laminator to mask large jobs like that.
tintguy31794
New Member
Its really hard to explain how to do it in words. If time permits I might make a video. I can handle 30"x 5ft by myself, much bigger than that and I have to get help or splice it.
washingtonsignguy
New Member
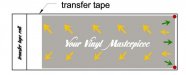
Okay this is what i do and it works very well. I get a wrinkle sometimes, it happens, but about 95% of the time none. heres some directions to this quick sketch. Start by pulling out the Ttape to the edge of the graphic being carefull you dont touch the graphic yet. set it down in the corners and press with your thumbs (red circles) making sure you touch the graphic and the table with the tape. now you should have a nice tight Ttape sitting above the graphic. start with the green arrows and get about 6-8" down. The Ttape should overlap the graphic at least an 1". if not you wilhave to put your hand down and hold firm so the whole thing doesnt slip away and you have an aww sh&&. Then go the other direction working from the center outwards in a diagonal direction (yellow arrows). continue this all the way to the end. its take practice for perfect. but youll get it. I never tried the big squeegee, sounds good but i guess i never really felt the need. I just did 2 24"x60" graphics this way with no wrinkles in less than 10 minutes with weeding. Hope this helps, a vid would be better.
Attachments
davidcarr87
New Member
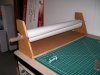
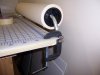
i use a home made device and never get wrinkles, no mater how long the vinyl sheet is
lets see your home made device...

CentralSigns
New Member
I got one too. Homemade devise that is. Mosh has a good pic of one a while back. search the forum for it.
showcase 66
New Member
I would be interested to see your home made device.i use a home made device and never get wrinkles, no mater how long the vinyl sheet is
CentralSigns
New Member
http://www.signs101.com/forums/showthread.php?t=58460
This is the same questions. And Mosh's picture is here. Check it out link above or search hobo tape. many answers here. My device is simular to Moshes except it has 2 rolls of tape and clamps to the table
This is the same questions. And Mosh's picture is here. Check it out link above or search hobo tape. many answers here. My device is simular to Moshes except it has 2 rolls of tape and clamps to the table
Last edited:
CentralSigns
New Member
My skills at pasting a link are bad so I bumped it back for your viewing pleasure. See favorite application tool.
HaroldDesign
New Member
phototec
New Member
YouTube videos that show you how it's done!
Here are two different YouTube videos that show you how it's done!
http://www.youtube.com/watch?v=quu134PRnQU
http://www.youtube.com/watch?v=WDcHV_trVEM&feature=related

Here are two different YouTube videos that show you how it's done!
http://www.youtube.com/watch?v=quu134PRnQU
http://www.youtube.com/watch?v=WDcHV_trVEM&feature=related