Hello!
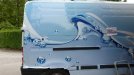
We just did this van wrap. Everything went well, except these corners of seeming windows. When we apply vinyl, we went over them like they would be flat. And then later we heat it up, and get them in right position. But viny was bubbling on whole corner! I could get it to be fix in corner!!! Then we cut line in corners, so that we realease vinyl, but then it come off on some places?! Not to mention, that cut line was very culry, so we cut another line with ruler, and now white line is 3-4mm width, but lines are straight and it doesnt look so bad.
So how in hell do you get vinyl in these window corner??? i saw a lot of vans, where there were same white line in corner, so i think we are not the only one with this problem! But i also saw vans, where there was no white line in corner. Viny was nicely sticked in corner.
Second question:
After installing background, we install other text. Do you charge that extra? Becouse it took some time and material, but the product look much better. We could print text with background, but then it could get off line, somewhere it could go curly... I think it is up to customer, if they are ready to pay more for better product?
but even here we had some problems with these window corner! Where letter line get on background vinly it came off again on some places. For 0,5-1mm. Will it come off more and more, or will it stay that way???
Here are some pictures... (look them in reverse order! )
)
We just did this van wrap. Everything went well, except these corners of seeming windows. When we apply vinyl, we went over them like they would be flat. And then later we heat it up, and get them in right position. But viny was bubbling on whole corner! I could get it to be fix in corner!!! Then we cut line in corners, so that we realease vinyl, but then it come off on some places?! Not to mention, that cut line was very culry, so we cut another line with ruler, and now white line is 3-4mm width, but lines are straight and it doesnt look so bad.
So how in hell do you get vinyl in these window corner??? i saw a lot of vans, where there were same white line in corner, so i think we are not the only one with this problem! But i also saw vans, where there was no white line in corner. Viny was nicely sticked in corner.
Second question:
After installing background, we install other text. Do you charge that extra? Becouse it took some time and material, but the product look much better. We could print text with background, but then it could get off line, somewhere it could go curly... I think it is up to customer, if they are ready to pay more for better product?
but even here we had some problems with these window corner! Where letter line get on background vinly it came off again on some places. For 0,5-1mm. Will it come off more and more, or will it stay that way???
Here are some pictures... (look them in reverse order!
)Attachments
-
 P1010403.JPG178.4 KB · Views: 248
 -
 P1010399.JPG166.5 KB · Views: 176
 -
 P1010401.JPG138.2 KB · Views: 231
 -
 P1010392.JPG169.3 KB · Views: 231
 -
 P1010389.JPG139.8 KB · Views: 164
 -
 P1010390.JPG75.7 KB · Views: 223
 -
 P1010388.JPG132.2 KB · Views: 207
 -
 P1010385.JPG110.3 KB · Views: 211
 -
 P1010387.JPG134.8 KB · Views: 229
 -
 P1010383.JPG96 KB · Views: 230
 -
 P1010382.JPG82.7 KB · Views: 186
 -
 P1010380.JPG177.1 KB · Views: 217
 -
 P1010381.JPG92 KB · Views: 219
 -
 P1010375.JPG94.2 KB · Views: 194
 -
 P1010378.JPG163.2 KB · Views: 154
 -
 P1010373.JPG111 KB · Views: 203
 -
 P1010374.JPG110.4 KB · Views: 207
 -
 P1010349.JPG131.8 KB · Views: 253
