-
I want to thank all the members that have upgraded your accounts. I truly appreciate your support of the site monetarily. Supporting the site keeps this site up and running as a lot of work daily goes on behind the scenes. Click to Support Signs101 ...
Search results
-
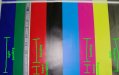
VP540 Banding in Magenta only
Check your media...try another brand to see if the banding continues. Check your profile. Check calibration. Check ALL head alignments. Do you have a bulk system? Check the height of the bulk system, too low starves the heads, too high floods.... As you can see, there can be several issues to...- Pacific Coast Sign
- Post #23
- Forum: Roland
-
-

Latex ink for your Roland, Mutoh, Mimaki
I guess it depends on exactly what you have in mind to print that you already cannot, and the difference of just how much more money you're going to charge, or make, using this new ink alone. The mild solvent prints on so many medias I can't imagine changing inks to print on one other media...- Pacific Coast Sign
- Post #14
- Forum: Roland
-
SP 300 Main Board
Be sure to put the battery in the new board. Did you save the parameters from your last board? You need to install the parameters to the new board. Install the new firmware. Initialize the printer. Peck does not have an "exe" tool, you need the old style of firmware updater to use with the Peck...- Pacific Coast Sign
- Post #2
- Forum: Roland
-
error message in Versaworks after changing Main board in Sp300v
They have not successfully upgraded the firmware and/or initialize the printer. Did you tell them to replace the battery from the old board? Check DIP Switch settings. Most importantly! Did they SAVE the perametors to replace? THIS IS IMPORTANT!- Pacific Coast Sign
- Post #2
- Forum: Roland
-
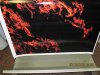
what would cause this type of banding on an sp-300v?
#1 Damper - replace #2 Media - try another brand- Pacific Coast Sign
- Post #27
- Forum: Roland
-
Problem with soljet pro II print heads
You should have the tech check the fuses for B & C group heads...and for the cause of blowing the fuses. Fuses are a LOT cheaper than a new board! many times the cause is loose flat cable (wire) connection(s) to the heads.- Pacific Coast Sign
- Post #3
- Forum: Roland
-
printing on chrome?
RTape chrome (gold, etc...) is printable and looks great. Allow to dry very well before contour cutting or laminating. If you cut too early (without laminating) the edges will curl.- Pacific Coast Sign
- Post #8
- Forum: Roland
-
Versaworks not centering print on media when checked and amount issue...
It's never been able to do more than 250 in one file. Are you sure you're not centered between the pinch wheels? Are you Getting Media Width first? This is where VW gets the width to center on. Check your media with on the printer and compare to VW.- Pacific Coast Sign
- Post #3
- Forum: Roland
-

SP-540 Printing blurred/overspray
First do a very good cleaning using swabs and a lot of solution. Then do a Medium Cleaning and look closely at your test print. If you still see overspray you have a damaged head ($995). The black part of Head 1 is always the first to be damaged as it's the first to hit an object.- Pacific Coast Sign
- Post #6
- Forum: Roland
-
Contour cut not read by Versaworks sometimes
Go to rolanddga.com ....Support....Choose your printer model (or at the bottom for legacy models) and click on Application and Software Guides.... you'll find a lot of information here to help.- Pacific Coast Sign
- Post #6
- Forum: Roland
-
Oracal 3164 gloss + Flexia = profile? HELP!
If you're using Flexi you can go to Oracal.com / support and download the Flexisign profiles for some of the Roland Printers.- Pacific Coast Sign
- Post #7
- Forum: Roland
-
when to change dampers in Vp540
You shouldn't need to replace unless you have worn or defective dampers, these last quite a long time. Ink starvation will be the key indicator when they need to be replaced - and be SURE to get the correct damper...third party dampers seals do not quite fit properly and become part of the...- Pacific Coast Sign
- Post #3
- Forum: Roland
-
Roland ECO ink not so ECO ???
.....anuria and death by acute renal failure? Whew! I thought that was me for a minute!- Pacific Coast Sign
- Post #39
- Forum: Roland
-
Roland SP-540V VersaCamm printing problem
To get the best prints on clear & static cling use the Overprint option (set to 2) and you'll see a much better print when holding up to the light. As a second option you may also double print...both work great for making the prints not look "washed out".- Pacific Coast Sign
- Post #12
- Forum: Roland
-
Help!!! Ultraflex banner printing problem
Does this happen with all your media or just the UltraFlex? Could be a defective roll. You may also want to check the pinch wheels - if you leave the wheels down for extended time while not printing the wheels get "flat spots" and cause your media to bunch - replace if needed (About $62/pair)- Pacific Coast Sign
- Post #17
- Forum: Roland
-
-
Print and cut length ?
The print/cut multiple rows works great! Try it....you may find it very helpful. This is meant to use without alignment marks...print/cut only, otherwise you'd have many jobs with the crop marks in the Que stacked behind each other and wasting material.- Pacific Coast Sign
- Post #19
- Forum: Roland
-
ink issue
First - What printer do you have? If you have a SP model it has no chip reader, it counts the pump cycles and the cartridge has the tab that extends out the side when the cartridge is empty (usually). Is this a Roland cartridge or 3rd party? How empty is the cartridge - it may be closer to empty...- Pacific Coast Sign
- Post #4
- Forum: Roland
-
Roland sp-540 color issue
Replace BOTH captops. Problem solved.- Pacific Coast Sign
- Post #3
- Forum: Roland
-
VersaCamm Sp540V Print and Cut problem
Your sensor isn't dirty, it wouldn't read if it were. You need to adjust the CROP Adjustment (Service mode). This MUST be done FIRST before doing a Print & Cut Alignment. Once you have the Crop adjusted, then adjust the Print/Cut and do an Environmental Match.- Pacific Coast Sign
- Post #11
- Forum: Roland