-
I want to thank all the members that have upgraded your accounts. I truly appreciate your support of the site monetarily. Supporting the site keeps this site up and running as a lot of work daily goes on behind the scenes. Click to Support Signs101 ...
You are using an out of date browser. It may not display this or other websites correctly.
You should upgrade or use an alternative browser.
You should upgrade or use an alternative browser.
Cut-out Letters on wall
- Thread starter 3Dsigns
- Start date

fixtureman
New Member
When we were doing this we used a pounce pattern
FASTSIGNS
New Member
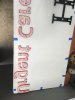
I've attached a pic of how we do all our dimensional (tape/silicon) install for the past 15 years. The letters are put on thier paper pattern, then transfer taped on top, then flipped over as a whole showing the backside. The mounting tape is applied on the back. The letters are in their correct position. The whole is loaded onto coroplast (or any other sacraficial material) in their finished position (but in reverse with the back side showing). After the silicon is applied, the whole coroplast is used to put up the whole text/logo. The bottom of the coroplast is the straight edge to use for leveling. The coroplast is pushed on the front so the tape and silicon seal. Coroplast removed, transfer tape removed and all is done. I know it sounds complicated, but the install take 10 minutes at the customer site. All our new employees are shocked at how easy and accurate this method is.
Attachments
Pixels Are Bad Mmmkay?
New Member
We use Oracal 631 or some other comparable, cheap, leftover vinyl from another job, as long as it will stick to the paint okay. Just make your cut vinyl pattern 1/8" oversized and placement is easy.
3Dsigns
New Member
How do you keep the letters from moving while you lay the transfer tape?I've attached a pic of how we do all our dimensional (tape/silicon) install for the past 15 years. The letters are put on thier paper pattern, then transfer taped on top, then flipped over as a whole showing the backside. The mounting tape is applied on the back. The letters are in their correct position. The whole is loaded onto coroplast (or any other sacraficial material) in their finished position (but in reverse with the back side showing). After the silicon is applied, the whole coroplast is used to put up the whole text/logo. The bottom of the coroplast is the straight edge to use for leveling. The coroplast is pushed on the front so the tape and silicon seal. Coroplast removed, transfer tape removed and all is done. I know it sounds complicated, but the install take 10 minutes at the customer site. All our new employees are shocked at how easy and accurate this method is.
tbullo
Superunknown
Earlier this year there was a discussion on how others installed ACM or PVC cut out letters. I didn't have any photos of my process, only the finial results. I always just seem to get the job going and forget to photo some steps. Well here is a few I remembered to do last week.
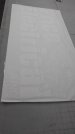
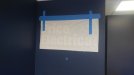
This job was some brushed aluminum on 6mm pvc and router cut. I plot out a paper pattern and tape to table. Then I take some old 8518 liner and place over the paper pattern and tape to table. I then put the VHB tape onto the back of the letters. Now I take the backing off the VHB taped letters and place them on the liner over the pattern. When this step is finished I pull the paper pattern out from under the liner and transfer tape across all the letters. I use 2 layers ( thanks SignBrad ). I put a level line across the job in a easy spot from leveling out at the job. When I get to the location, I just tape on the wall in place, level and center up and then pull the liner from behind the letters. Most all the work is done in the shop saving time on the location.
I have used this method for letters 3mm up to 12mm. I have used this method for 12mm x 12''tall letters that run out 8 feet.
I thought maybe some people could use this trick and its super easy. I have a few accounts that like 6mm copper letters and logos that are smaller then 36'' and I just provide it to them put together like this and they can do it on their own.
Merry Christmas
Attached Files:
a" style="margin: 0px; padding: 10px 10px 0px; overflow: hidden; zoom: 1; background: none center top repeat-x rgb(240, 241, 241); border-radius: 5px;">-

1213171550.jpg
File size:
1.1 MB
Views:
133 -
1213171606.jpg
File size:
886.3 KB
Views:
128 -
1215170953.jpg
File size:
945.4 KB
Views:
124 -

1215170956b.jpg
File size:
947.1 KB
Views:
124 -

1215170957_HDR.jpg
File size:
1 MB
Views:
121 -

1215170957.jpg
File size:
1.1 MB
Views:
147
MikePro
Active Member
never hurts to add a little silicone adhesive with VHB tape install. they compliment each other well.
if you can't make a pounce pattern, which I think is the easiest/cleanest way, then I'm a huge fan of the "wing it" method:
1) plot the pattern
2) painter's-tape mount it on the wall
3) use a pen/pencil to "dent"/scratch through the paper certain corners of each letter
4) mount the letter/logo. use the dimples you've marked in the painted wall as your alignment, making sure you've marked it so that the letter covers your "damage"
4a) tear-away the paper as you go, dealing with letters/logo elements individually, so you don't lose track of what marks you're moving onto next
FASTSIGNS
New Member
Just like you would transer RTA. Pull the tape with a little air under and lay onto of letters. We just make sure the bottom of the tape is level/lined up with the bottom of the letters.How do you keep the letters from moving while you lay the transfer tape?
FASTSIGNS
New Member
Yes, this is how we do it. Good pics. So easy and letters are always in their correct placement. Super fast too!Earlier this year there was a discussion on how others installed ACM or PVC cut out letters. I didn't have any photos of my process, only the finial results. I always just seem to get the job going and forget to photo some steps. Well here is a few I remembered to do last week.
This job was some brushed aluminum on 6mm pvc and router cut. I plot out a paper pattern and tape to table. Then I take some old 8518 liner and place over the paper pattern and tape to table. I then put the VHB tape onto the back of the letters. Now I take the backing off the VHB taped letters and place them on the liner over the pattern. When this step is finished I pull the paper pattern out from under the liner and transfer tape across all the letters. I use 2 layers ( thanks SignBrad ). I put a level line across the job in a easy spot from leveling out at the job. When I get to the location, I just tape on the wall in place, level and center up and then pull the liner from behind the letters. Most all the work is done in the shop saving time on the location.
I have used this method for letters 3mm up to 12mm. I have used this method for 12mm x 12''tall letters that run out 8 feet.
I thought maybe some people could use this trick and its super easy. I have a few accounts that like 6mm copper letters and logos that are smaller then 36'' and I just provide it to them put together like this and they can do it on their own.
Merry Christmas
Attached Files:
a" style="margin: 0px; padding: 10px 10px 0px; overflow: hidden; zoom: 1; background: none center top repeat-x rgb(240, 241, 241); border-radius: 5px;">
1213171550.jpg
File size:
1.1 MB
Views:
133
1213171606.jpg
File size:
886.3 KB
Views:
128
1215170953.jpg
File size:
945.4 KB
Views:
124
1215170956b.jpg
File size:
947.1 KB
Views:
124
1215170957_HDR.jpg
File size:
1 MB
Views:
121
1215170957.jpg
File size:
1.1 MB
Views:
147
Chris Keena
New Member
Any vinyl or paint mask will do. Don't pull the release liner though, just tape it up as if it is paper. VHB should be plenty strong, and can't hurt to use silicone. And for your template, don't forget to add a stroke or make it a 1/32" or 1/16" larger than your cut letters. Stud mount is the best for letters your size, but if you're not ordering from Gemini, it's not necessary.
MGB_LE
New Member
Is there a video of this process you'd be willing to share? We might practice one some walls at our plant before adopting the process for clients, We usually farm out the installs but as dept manager I'd like to grow our skills.I've attached a pic of how we do all our dimensional (tape/silicon) install for the past 15 years. The letters are put on thier paper pattern, then transfer taped on top, then flipped over as a whole showing the backside. The mounting tape is applied on the back. The letters are in their correct position. The whole is loaded onto coroplast (or any other sacraficial material) in their finished position (but in reverse with the back side showing). After the silicon is applied, the whole coroplast is used to put up the whole text/logo. The bottom of the coroplast is the straight edge to use for leveling. The coroplast is pushed on the front so the tape and silicon seal. Coroplast removed, transfer tape removed and all is done. I know it sounds complicated, but the install take 10 minutes at the customer site. All our new employees are shocked at how easy and accurate this method is.
MikePro
Active Member
zombie thread. thousands on videos available on youtube but i picked out one for ya.(linked with video for dimensional letter install)