• I want to thank all the members that have upgraded your accounts. I truly appreciate your support of the site monetarily. Supporting the site keeps this site up and running as a lot of work daily goes on behind the scenes. Click to Support Signs101 ...

Living Wall Sign?

jfiscus

Rap Master
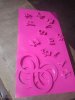
This will be a first for me so I'm coming to all of you to hopefully answer an issue before it ever arises. We are doing studded dimensional letters protruding about 6" off of a living wall. This will be in an (interior) office space, but my concern is about humidity/moss/mold potential issues.

They'd like their logo/lettering cut out of a white material, so if there is a potential for it to start to turn green in the future I'd like to avoid that.

Are there any thoughts on any materials that might be better to use for this project? What ones to avoid?

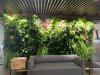
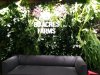
I'm going there tomorrow to do a site survey to determine the best mounting procedure. Should be a fun project! Photo of the actual wall attached.
 

Attachments

  • IMG_3691.jpg
    IMG_3691.jpg
    3.3 MB · Views: 744

Bradley Signs

Bradley Signs
WOW! That looks like a place in Fort Worth area I was at a number of years ago....
Unless they don't have A/C or some sort of air movement equipment, cant see a problem myself. Aluminum doesn't rust, and anything with paint will attract mildew, unless the air is kept moving.
Are the plants watered mechanically? Will water be able to sit on top the letters or inside the cutouts?
There is some maintenance to this type of thing, and I can't imagine that place not having a cleaning crew.
Would seem to me, as long as the parts are rust proof, stainless or aluminum, Seems like a cool project.
I hope you post some pics when it's done.
 

MikePro

New Member
treat it like an exterior sign, and you should be fine. mold/corrosion is a living thing too, but highly unlikely that will even be a factor unless you're making it out of paper-mache
 

Tessellate

New Member
We have done something like this before. We have a 150w laser in house so we reverse cut 1/2” white acrylic and mark the locations for pins.

Recently did a wall wrap there and they still look brand new. As mentioned they will require some cleaning here and there from water spots but the cast acrylic is rock solid.
 

Brando

New Member
I’d probably go with white acrylic. But I think you’ll have trouble taping up a pattern for installation.
 

jfiscus

Rap Master
Not the best photos, but everything turned out awesome. We pin mounted the letters and welded the pins to rails (painted black). Hung the whole thing (around 2 pounds) by thin black wire off of 2 hooks at the top. We added adjustable legs to the back so that we could get it to sit flat with the uneven wall surface.
 

Attachments

  • 118702014_344192780291727_7663290584791709626_n.jpg
    118702014_344192780291727_7663290584791709626_n.jpg
    110.6 KB · Views: 310
  • 118577801_1063523694066818_126158393374041794_n.jpg
    118577801_1063523694066818_126158393374041794_n.jpg
    82.9 KB · Views: 323

Stacey K

I like making signs
Not the best photos, but everything turned out awesome. We pin mounted the letters and welded the pins to rails (painted black). Hung the whole thing (around 2 pounds) by thin black wire off of 2 hooks at the top. We added adjustable legs to the back so that we could get it to sit flat with the uneven wall surface.
I love it the concept of this, the sign looks great, good job!!!! Thank you for posting a finished pic!
 

Bly

New Member
Nice. We did some lettering for a pharmacy that was meant to float in front of a bulkhead covered in long moss.
The letters were glued to a clear acrylic panel which dropped into a slot.

Your solution looks really neat.
 

jfiscus

Rap Master
We're already on to our 2nd living wall sign.
Did a few things differently this time.
Pics below should explain a lot of the process for the curious. ;)

119403493_319474805781168_7907809038903368437_n.jpg 119655670_665043981108505_5439276738817393940_n.jpg 119340575_383301356397432_4026589985697935888_n.jpg 119245757_3126175334158175_6348412964138821590_n.jpg 119244614_1239899916371917_3127987230454865569_n.jpg 119506982_992395557851547_6461328444071530279_n.jpg 119217058_686080055679135_1218248922095326829_n.jpg 119471592_2791556661129355_3382382989448278050_n.jpg 119646863_948333248996560_4511930141088920279_n.jpg
 

Greg Kelm

www.cheetaprint.com
You should consider a mig or even better, a tig welder with gas shield. Some scrap leather to avoid the splatter on your routed parts is not a bad idea either. The final result looks really nice!
 

jfiscus

Rap Master
You should consider a mig or even better, a tig welder with gas shield. Some scrap leather to avoid the splatter on your routed parts is not a bad idea either. The final result looks really nice!
Look at the 2nd image. This is a sacrificial set of letters.
The "real" letters were being painted while the others were attached to the framework getting welded together.

It seems no matter how well you think you cover it up weld spatter finds its way to the letters and discolors or damages them.
Since they're the exact same pattern we just popped the junk ones off and pitched them and painted the frame without worry of over-spray from either color.
After the last coat of paint we will glue them back together for install later this week.
 

Attachments

  • 119507827_2390313414608841_2635291829602051901_n.jpg
    119507827_2390313414608841_2635291829602051901_n.jpg
    315.1 KB · Views: 198

Greg Kelm

www.cheetaprint.com
Look at the 2nd image. This is a sacrificial set of letters.
The "real" letters were being painted while the others were attached to the framework getting welded together.

It seems no matter how well you think you cover it up weld spatter finds its way to the letters and discolors or damages them.
Since they're the exact same pattern we just popped the junk ones off and pitched them and painted the frame without worry of over-spray from either color.
After the last coat of paint we will glue them back together for install later this week.
I see it now. Was thinking that there has to be a better way to avoid all that, but your method make sense now.
 

jfiscus

Rap Master
I didn't know it was getting installed right under the last one, but it turned out pretty good!
Both of these faces are about 12" in front of the actual "wall" surface.
 

Attachments

  • DSC00797.JPG
    DSC00797.JPG
    1.7 MB · Views: 183
Top