• I want to thank all the members that have upgraded your accounts. I truly appreciate your support of the site monetarily. Supporting the site keeps this site up and running as a lot of work daily goes on behind the scenes. Click to Support Signs101 ...

Need help with Lexan Labels!

rudeez

New Member
Hey.

Im very new to everything in this industry but im ready to learn and figure out. Excuse my bad english aswell, kinda don't know the terms in english but i'll try to explain.

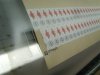
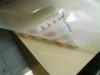
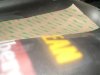
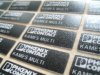
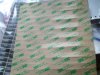
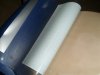
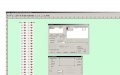
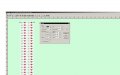
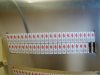
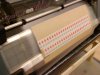
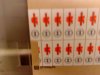
Im about to make Lexan labels. Using a Gerber EDGE2 and Gerber inVision plotter. So far ive figured out that ill need to print the labels mirrord. So i went with the print and putted a backing white foil in in the Omega gspplot software. Applied to "job area". I would want to make the backing white to bleed but couldent really execute that. So first i printed red, then black and then the backing white and all mirrord. Putted on M3 adhessive wich shows in the pictures and wrapped the roll around. Now the problem occured to me. The Target point to aim at for cutting got on the left side instead of the right wich im used to so the cutting process started to the far left.
So how on earth do i get the cutting to go "reverse" instead.
And do you guys got any other tips and trix when making lexan labels?

Sorry for bad picture quality, cellphone camera :/

/Best regards, Jimmie
 

Attachments

  • dsc00695n.jpg
    dsc00695n.jpg
    62.3 KB · Views: 113
  • dsc00697oyu.jpg
    dsc00697oyu.jpg
    113.7 KB · Views: 74
  • dsc00696x.jpg
    dsc00696x.jpg
    86.1 KB · Views: 111
Last edited by a moderator:

Fred Weiss

Merchant Member
The steps I normally follow are:

1. Set the entire job up as right reading in Composer. All colors except the white should be set to "Overprint".
2. Output to GSPPlot.
3. Reverse both the image and the print order in GSPPlot. Target should print where you have assigned it to print.
 

rudeez

New Member
Damn, tried it now, did exactly like you said and when i multiply them and make like 2 rows with 24 in each the cut target is stuck down in the wrong corner. If i press END for start/end positions, I can't change the positions in any way. start is stuck at bottom left and end at bottom right. Maybe i should get start at the top left instead some way?

Ill make a screenshot!

EDIT SCREENS:
http://img5.imageshack.us/img5/562/screen1bvr.jpg
http://img5.imageshack.us/img5/8459/screen2bxk.jpg


EDIT AGAIN:

Any trick for making bleed on a backing white since the white on those arent in the label itself so i can't make a bleed on the rectangular object in Composer?
 
Last edited:

Fred Weiss

Merchant Member
That is normal behavior for the target.

With regard to repeats, I found many years ago that it is best to setup the vertical repeats in Composer and the horizontal repeats in GSPPlot.

Finally, as to showing your screen shots. signs 101 requires that all images be uploaded to Signs 101 and not linked from somewhere else. This is most easily done by clicking the paper clip icon when posting which takes you into a direct upload mode.
 

Bill Modzel

New Member
I do these a bit differently. I print as you did and the Df tape that I use has a clear backing on it so I cut in from the back also. I usually put 3 or 4 cutting paths on top of each other in Illustrator, (I print and cut with MacImprint), and cut almost through the lexan. They easily pop out after that.
 

omgsideburns

New Member
wow you guys are confusing me.

i would setup all my colors cuts in composer for ONE decal, send it over to GSPplot and flip it, change my print order, and set my repeats.. never had a weird crop mark issue..
 

Fred Weiss

Merchant Member
Where you do your repeats is probably a matter of how you were shown to begin with. In my case, I was told that doing the vertical repeats in Composer resulted in less registration issues in GSPPlot ... so that's the way I've always done it.

Either way works as long as the end result meets your approval.
 

rudeez

New Member
Thing is that, if i do exactly like that. flip it, reverse print order and put a target mark on the right bottom corner as deafult. Ill print it on the backside of this lexan material since it's the blank side and i want the matt side up. so when it's printed and done i flip the film to get it upside and the target mark gets on the left side instead :/
 

Fred Weiss

Merchant Member
Thing is that, if i do exactly like that. flip it, reverse print order and put a target mark on the right bottom corner as deafult. Ill print it on the backside of this lexan material since it's the blank side and i want the matt side up. so when it's printed and done i flip the film to get it upside and the target mark gets on the left side instead :/

You always cut the side you print. What you are attempting to do is just not the correct procedure.
 

rudeez

New Member
So whats the right procedure then? :/ COuse theres no other way to do it really. The lexan dosen't have any kind of adhesive on it. Maybe i could get some more pictures tomorrow. And post the right this time :)

But yeah. I might be all wrong but to me it seems the way im trying to execute it is the only way. Can't print it ontop of lexan material.
 

stickersteve

New Member
keep it simple

You may not be able to do this, but I have done a few jobs where I just used the tuff cover lexan like laminate. That way you can just treat the job like any other.

Steve
 

rudeez

New Member
Ah well i get your point. Plotter is a Gerber EnVision. Still the problem is that it should be cutted from the upside, with that i mean with the lexan surface upside. Thats how the guy ho did this before made it. Been trying to ask him but due to issues between him and my boss he don't wanna explain how he has made it in the past. All i got is some labels he done before to watch and understand how he made them and he made it the way im describing it, the only problem i got when doing it the way i did it are that the cut marks are for some reason not correct so the plotter cuts the labels about 2 mm wrong, tryied to do it with 4 marks in each corner and still got the same problem. No Idea how i will fix this, can't "play" aroudn to much with the material either since it's so damn expensive. :/
 

rudeez

New Member
So i took some photos to show you with sharper quiality.
As you can see it's printed mirror flipped and reverse print order. Then i simply flip the work after applying the adhesive. Smooth so far and when ill cut it, it's missing for some stupid reason even tho i used 4 targets. Tried on another piece yesterday aswell and used "center" target and same thing happen, or well. I was even more out of "sync", about 10mm wrong. The Later pics with the phenix labels are labels done by the old guy who made this. Been trying to use it as a reference. He cut it from upside and i know it's possible. And the last pic is some work he diden't finish, seems like he used a separate backing finish in it's own process since it's filling the whole area, wich is better to not get any missed areas when cutting. The pressure is on, got about 10 orders with 200-3000 amounts of labels on each one wich has to be done before 12th of june and until i figure out the problem with the cutting, im stuck...


If i use the regular target "lower left" and then flip it when cutting, the target gets on the "lower right" side instead obviosly. Isen't there any simple setting on the Gerber invision 375 that tells it to start cutting from lower right instead of lower left. To me it sounds like the smartest thing but. so it cuts the jobb just like normaly but strats from the lower right.
Any suggestions?


EDIT:

Tried again using the settings on the last two thumbnails, the printscreens. Printed it on the backside of the lexan wich is blank, and flipped it when i plotted. Last 3 pictures are from this test.
Settings and the result are shown on the last 3 pics.
 

Attachments

  • SL274614.jpg
    SL274614.jpg
    241 KB · Views: 64
  • SL274617.jpg
    SL274617.jpg
    209.4 KB · Views: 90
  • SL274620.jpg
    SL274620.jpg
    244.1 KB · Views: 94
  • SL274621.jpg
    SL274621.jpg
    237.2 KB · Views: 94
  • SL274618.jpg
    SL274618.jpg
    276.5 KB · Views: 114
  • SL274619.jpg
    SL274619.jpg
    290.1 KB · Views: 89
  • SL274624.jpg
    SL274624.jpg
    218.6 KB · Views: 94
  • 4corners1.jpg
    4corners1.jpg
    43.6 KB · Views: 75
  • 4corners2.jpg
    4corners2.jpg
    35.3 KB · Views: 76
  • SL274627.jpg
    SL274627.jpg
    47.8 KB · Views: 88
Last edited:
Top