• I want to thank all the members that have upgraded your accounts. I truly appreciate your support of the site monetarily. Supporting the site keeps this site up and running as a lot of work daily goes on behind the scenes. Click to Support Signs101 ...

Hand Carved Ribbon....Step x Step

mrchips

New Member
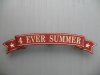
First a word on the design. IMO, the "fold" of the ribbon should be at least as long as the ribbon is high......in this case, the ribbon is 5" high, so the fold is 5"...A bigger fold is great, but any shorter, the ribbon looks a little stiff.....IMO.

I make the ends in two layers to give it some depth.......it certainly can be done as a single piece and the basic process is the same (except for the glue-up).
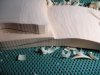
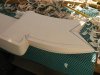
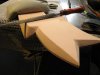
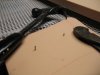
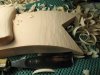
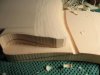
pic 1...top and ends cut out on a band saw.
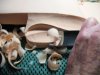
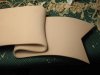
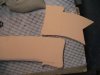
pic 2...how they look together
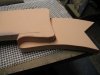
pic 3...I hammer two 1" brads into one piece and cut off the heads with wire cutters and press the top and bottom together.....this gives me good alignment when glueing and prevents the two pieces from sliding around when they are clamped.
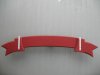
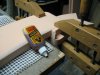
pic 4...Now spread gorilla glue, in thin beads, on one side and spray as much water as possible on the other......it CAN'T be TOO wet.
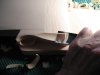
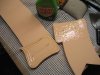
pic 5...clamp. Very quickly, what looks like little beads of water will show up on the seams. Within about a half hour, it will expand and look foamy. Start checking the foam to see if it's sticky.....if it is, wait a bit. As soon as the stickyness is gone......
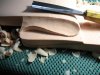
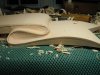
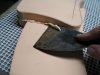
pic 6... remove the foam with any kind of dull blade. If you wait for the foam to harden, you may tear out pieces of hdu with the removal.
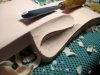
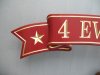
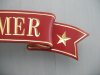
pic 7...using a somewhat flat gouge (#5 is ok), shape the top of the ribbon fold.
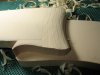
pic 8...do the same to the end.
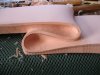
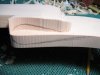
pic 9...sketch the fold profile.
pic 10..using a veiner (a gouge with a very deep curve forming a complete "U"), set the depth of the ribbon return next to the fold.

I'll try to get some time later this afternoon and show the next stage.

Joe,

Makin Chip$ and Havin Fun!
 

Attachments

  • 026.jpg
    026.jpg
    45 KB · Views: 148
  • 030.jpg
    030.jpg
    41.5 KB · Views: 124
  • 031.jpg
    031.jpg
    68.3 KB · Views: 119
  • 028.jpg
    028.jpg
    56.5 KB · Views: 138
  • 022.jpg
    022.jpg
    63.7 KB · Views: 188
  • 034.jpg
    034.jpg
    45.4 KB · Views: 132
  • 036.jpg
    036.jpg
    42.9 KB · Views: 139
  • 039.jpg
    039.jpg
    56.3 KB · Views: 132
  • 045.jpg
    045.jpg
    45.7 KB · Views: 142
  • 046.jpg
    046.jpg
    38.9 KB · Views: 139

mrchips

New Member
I'll throw these in now for those that didn't see the finished ribbon before.

Joe,

Makin Chip$ and Havin Fun!
 

Attachments

  • 007.jpg
    007.jpg
    36.7 KB · Views: 123
  • 006.jpg
    006.jpg
    38.2 KB · Views: 130
  • 004.jpg
    004.jpg
    33.2 KB · Views: 120

SignManiac

New Member
Joe, very nice step by step...I'd say you have it down pat! I've done a few over the years but never as nice as those..
 

mrchips

New Member
pic 11...here the ribbon end is carved against the fold.
pic 12 & 13...now, usinga #7 22mm gouge, carve the hollow under the top ribbon.
pic 14...the lower hollow is carved the same way.
pic 15...shows both roughed out.
pic 16...using the veiner, the hollow is deepened and the flat of the lower ribbons take shape.
pic 17...the thickness of the ribbon is sketched in about 1/4 to 3/8" thick.
pic 18...the veiner is again used here to deepen the hollow under the top and middle ribbon. The visable tops of the ribbon should be flat and flow evenly. This completes the tops of the ribbons. It is now sanded and preped for painting.
pic 19..Here, I've marked the undercutting of the remaining edges of the ribbon. The edge of the ribbon should be marked as thick as I did the folds and I set it back about 3/4"
pic 20...I used a rasp and sandpaper to quickly create the undercut.
pic 21...here she is all sanded up ready for paint.
pic 22...I glue and screw galvanized brick ties to the back for wall mounting. It will be hung in an elevated position so the mounting won't be visable from the ground.

That's it! I'm sorry for some of the blurry photos :banghead:

I'll do my best to answer questions. Hope this helped get someone started carving one of the most visable icons from the "Ship Carving" days of old.

Thanks for following along.

Joe,

Makin Chip$ and Havin Fun!
 

Attachments

  • 047.jpg
    047.jpg
    52.2 KB · Views: 118
  • 048.jpg
    048.jpg
    33.4 KB · Views: 129
  • 049.jpg
    049.jpg
    53.3 KB · Views: 138
  • 052.jpg
    052.jpg
    41.9 KB · Views: 125
  • 053.jpg
    053.jpg
    51.2 KB · Views: 123
  • 056.jpg
    056.jpg
    45.3 KB · Views: 150
  • 059.jpg
    059.jpg
    58.6 KB · Views: 133
  • 060.jpg
    060.jpg
    49.8 KB · Views: 121
  • 066.jpg
    066.jpg
    63.9 KB · Views: 121
  • 069.jpg
    069.jpg
    48.9 KB · Views: 135
  • 078.jpg
    078.jpg
    43.1 KB · Views: 126
  • 008.jpg
    008.jpg
    23.1 KB · Views: 115

mrchips

New Member
oooops,

Someone always asks "how long did it take?" and "How Much?"

Each end takes close to 1 1/2hrs to carve. The back undercuts and sanding take about 2 hours. Total of 5 hours. I charged $450 (includes 3 coats of paint....1 primer and 2 topcoats.....latex) for the ribbon plus the gilded lettering.
BTW, this one is 4' long.

Joe,

Makin Chip$ and Havin Fun!
 

MikeSTK

Dawns Vinyl Designs
Two idiot questions:

What is the material?

Are the letters carved as well? I mean it looks like that but I can't be sure.

Extremely nice!
 

mrchips

New Member
Thanks Everyone!!!

Mike, it's HDU...... Duna 20lb. I can endorse 85% of the hdu makers......no big deal differences. I hand carve the lettering as well.

That said.......if this were pine, the tools and cutting marks would be the same. HDU and wood have different challenges. They "carve differently!".............so?
The object is really,.........to carve a ribbon. So I do. I carve the same ribbon in either material the same way............only I carve each material differently.......to get the same image.

If that doesn't confuse you, nothing will!!!!! LOL

I'm confused..............................too

Joe,

Makin Chip$ and Havin Fun!
 

MikeSTK

Dawns Vinyl Designs
Chips,

I knew it wasn't wood from the pics. Seems the HDU carves really nice! Much nicer than pine anyway. Your skill is light years beyond me and I had to peek as my knowledge is wood based as opposed to sign making. :notworthy:

Was curious if the material was vinyl friendly? Please don't curse me, just wondering if it could be applied. I don't think you could stick me with a veining tool from there???
 

mrchips

New Member
Thanks guys!

Mike......I'm totally a wood guy........and signs? It's just another thing I do as part of my business as a carver. HDU and laytex are the best products to make signs from.......so I do. I don't prefer to carve HDU. But I like the money my little sign business brings in.

My day job is carving relief images of country and wildlife scenes. All in pine with colored oil stain finishes......been a 32? year career. Been carving wood since I was 9.

Lets see......32 and 9=41.........where did those other 23 years go???????:smile:

Joe,

Makin Chip$ and Havin Fun!
 

mrchips

New Member
Sorry......forgot the vinyl question.

Don't bet the farm on this......

I use Ben Moore Aura. First, I used their Moore Glow line.

(I pre finish my signs.....then, mask, carve letters, paint/gild....remove mask)

The mask didn't stick very well to the Moore Glo......sticks great to the Aura. Now i do 2 coats of Glo topped with a coat of Aura.

I don't stick vinyl to anything except as a mask.......so i can't tell you really, whats gonna work. Ask the house.:smile:

Joe,

Makin Chip$ and Havin Fun!
 

skyhigh

New Member
The mask didn't stick very well to the Moore Glo......sticks great to the Aura. Now i do 2 coats of Glo topped with a coat of Aura.

Joe,

Makin Chip$ and Havin Fun!

Joe, why wouldn't you just use a few coats of the Aura?
 
Top