• I want to thank all the members that have upgraded your accounts. I truly appreciate your support of the site monetarily. Supporting the site keeps this site up and running as a lot of work daily goes on behind the scenes. Click to Support Signs101 ...

Need some insite on sandblasting wood

what the

Owner/op
Picture attached:
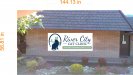
I have a customer who is moving into finalizing a large sign that will need to be made custom...I know it will be redwood, I understand the grain on the wood panels all have to match. ...If I choose all Vertical OR All horizontal grain...Is one type of direction make an ugly sandblast effect? Any suggestions on what to ask for at the wood supply?
Next- What is the best way for joining these panels together?

Thank you so much!!
 

Attachments

  • setup on wall to scale 12ft.jpg
    setup on wall to scale 12ft.jpg
    857.4 KB · Views: 344

Johnny Best

Active Member
If you type in "Redwood sandblast' up on the right hand top side where it says Search Signs 101 you will get a lot of information there from old posts on your subject matter, good luck.
 

Gino

Premium Subscriber
If that sign is to be 12' long, then you want 12" x 144" x 6/4" all clear-heart vertical grain. The boards at 12" will really be about 11.25" wide, Not many lumber places carry this kinda wood and it's very expensive. Do't get any flat grain, or you'll be sorry.

Either use a biscuit joiner or an old trick is to put a long finishing nail in one side, snip the end off and drive it into the other proceeding board. To glue them up, you'll need about 8 pipe clamps and we use a two-part boat glue. We keep them clamped for 48 hours. Don't clamp them all in the same direction, but stagger them. Then sand them down and get them ready to accept the cut rubber. Hopefully, you have access to a drum roll sander to get it uniformly flat.
 

Billct2

Active Member
That is one big sign to try as your first custom fabricated and blasted redwood sign. I worked at a shop that was one of the first around here to do sandblasted back in the early 80s and we did a ton of them. I don't do any of my own blasting anymore, prefer to sub it out.
One design note, I don't see a frame, personally I never liked the way a sign looked that was blasted right to the edge, unless they were going for a real rustic look.
 

Gino

Premium Subscriber
Yes, the layout is all wrong for a sandblasted type sign. I figured that was gonna be another thread for this guy...... ;)
 

MikePro

New Member
why not stick with something you know, rather than risk expensive materials/processes on a sign you're making for the first time?

printed woodgrain background on MDO/aluminum pan, with painted dimensional lettering stud mounted to the face, would save your client a buttload of $$$.
 

equippaint

Active Member
Practice sandblasting or have whoever will do it practice on some long scrap. Wood can be tricky and unforgiving. Personally Id go with a thicker font just to eliminate that being a potential problematic area. Real thin areas don't leave much surface area for the mask to stick. Also add a border as was mentioned.
 

Eric H

New Member
Not knowing your skill level or equipment and only judging by your questions I can't imagine doing that for your first sandblasted sign. I made these for years in a well equipped shop and something that size wouldn't be easy. I don't think it's fair to the customer to experiment with something that size. Could be an expensive lesson.
 

visual800

Active Member
go ahead and price the redwood and then price some 1/4" maxmetal letter and graphics adhered to 1/8" maxmetal background. the look will basically seem the same but I bet you $20 they will go with maxmetal, problem solved
 

visual800

Active Member
customers see stuff they "think" they want. Always be ready for a backup alternative option that is less expensive and more sensible and you will probably make more money off of.
 

spectrum maine

New Member
I WOULD DO IT IN CNC ROUTED H.D.U. RAISED LETTERS , THEN SCOOP CARVE THE BACKGROUND, ONLY TAKES ABOUT 2 HRS TO SCOOP CARVE & LOOKS REALLY SHARP.
 

Signsfyi

New Member
A redwood blasted sign of that size will have to have some type of steel frame for support of structure. Each segment of redwood will start to expand/contract and do what wood does over time (warp and crack). The frame will minimize this characteristic. Though I disagree with the lick and stick a decal on a flat surface crowd, this size of sign has a pretty high skill set. If you are not familiar with building redwood sign blanks, you might want to start smaller. Contracting this type of work out will make the price skyrocket on an already expensive sign.
You also might consider HDU signfoam. You can blast directly and get a stucco texture or use a GrainFrame to create the deep woodgrain appearance. It also comes in several thicknesse and can be glued up in to larger sizes (starts as a 4'x8') fairly easily. On larger HDU signs, I use unistrut to give the sign some structural rigidity, as well as, a structure for mounting. Good luck
 

Gino

Premium Subscriber
A redwood blasted sign of that size will have to have some type of steel frame for support of structure. Each segment of redwood will start to expand/contract and do what wood does over time (warp and crack). The frame will minimize this characteristic. Though I disagree with the lick and stick a decal on a flat surface crowd, this size of sign has a pretty high skill set. If you are not familiar with building redwood sign blanks, you might want to start smaller. Contracting this type of work out will make the price skyrocket on an already expensive sign.
You also might consider HDU signfoam. You can blast directly and get a stucco texture or use a GrainFrame to create the deep woodgrain appearance. It also comes in several thicknesse and can be glued up in to larger sizes (starts as a 4'x8') fairly easily. On larger HDU signs, I use unistrut to give the sign some structural rigidity, as well as, a structure for mounting. Good luck

A steel frame would be nice, but not at all necessary, especially when being mounted flush on a wall. If the job is handled correctly, not one seam will crack or come apart, not even after 20 or 30 years. Redwood sandblasted signs was our specialty back in the 80s & 90s. Most of our signs were 48" to 84" tall by about 20' long. Solid boards the whole 20 '. Other than wood battens, no steel was used, unless we were making signs being hung from some structure or within a structure.

There was a time when we had 2 or 3 of these big bad boys going on at the same time in our shop. Not one ever split, cracked or anything else. The most damage was mold or mildew because of the direction they faced. We repaired a lot of signs from other shops due to some of the problems you mentioned, but they were never made correctly from the start.
 
Last edited:

Marlene

New Member
you might be better off buying a redwood blank rather than making your own. are you blasting the background or the letters? the reason I ask is because the font for the name is kind of whimy and with a blasted background, it might not show up very well with all the grain pattern. I'd v-groove the letters and leave the background smooth
 

tbullo

Superunknown
I agree with Gino on the steel frame. My experience is that steel frames cause more damage in the long run. I think it's probably due to the different rates of expansion.
 

studio 440

New Member
This is a not a project you want to learn on . Its a very expensive material order that not done right can go bad fast , Like Gino says its very labor intensive and takes some carpentry and building experience , like reversing the wood crowns to avoid warping. I think Johnny Best has the best solution as i dont think the design is even appropriate for a blasted sign . ACM with HDU carve letters would work great and be more cost effective .What is your budget on this? Perhaps as marlene suggests you could upsell to a flat v-cut and gold leaf letterd sign . you might want to price out a foam routered c&c blank and faux finnish , good luck and keep us posted on your progress
 
Top