• I want to thank all the members that have upgraded your accounts. I truly appreciate your support of the site monetarily. Supporting the site keeps this site up and running as a lot of work daily goes on behind the scenes. Click to Support Signs101 ...

what do you hate about your software?

signmeup

New Member
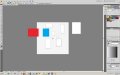
I think I just had an epiphany(SP?)!! You can draw your own artboards all over the place any size you want(up to 225x225). Then whichever one you click on becomes "live". It is the page that is active for printing. It's pretty slick really. They are even numbered so you don't get confused! And they are listed as PAGE by the software BTW.

artboard = page

Thanks Eric! Without your thread and patience, I probably never would have figured this out.
 

The Vector Doctor

Chief Bezier Manipulator
Here's what I see. The "page" is the little, tiny square black outline, the "artboard" is the white square and the "grey area" is... the grey area. I can draw on any of them. The coloured rectangles are stuff I drew.
Only stuff on the "page" will print.

I see the problem. I am using cs5 now and already forgot how older versions display things. The dark gray is actually the limits of Illustrator. NOTHING can go beyond that 227x227 square. In other words I cannot design a 30 long banner as this is 360 inches. The box in the center surrounded by a thin black outline is the page/document size. Anything outside of the outlined box is the non printing area. In CS5 this area is a light gray but the dark gray is still there. This dark gray area does not exist in Corel because I guess there is no limitation in size?
 

signmeup

New Member
Look... here's a whole bunch of them. The active page is the one with a darker black outline.

Now the 225 x 225 square is the "canvas". It no longer behaves like a page and has no number. You can draw stuff out in grey land to an extent. It doesn't seem to like it much but works about 80% of the time.
You can draw new pages out there too.

Wait a minute.
The 225 square area is the canvas and nothing else. I had drawn a 225" square artboard over it. (Sigh)
 

Attachments

  • AiScreen2.jpg
    AiScreen2.jpg
    30.9 KB · Views: 86
Last edited:

300mphGraphics

New Member
Flexi Sign Pro 8.6v2, I import a label, add a contour cut to it, send it to Production Manager, tell it I want multiple copies and I get a set of 4 crop marks around each and every label. Have to go back to Flexi and step and repeat then go to PM. Make for biggerer files and wastes time.
 

signmeup

New Member
The things you were calling pages that you can draw all over and they get numbers are artboards. As I've been saying all along...boy this is a dumb argument.

http://help.adobe.com/en_US/illustrator/cs/using/WS714a382cdf7d304e7e07d0100196cbc5f-6328a.html

Pages don't exist until the output phase.
I totally agree. This is a stupid argument. (you keep coming back though)

Hover your mouse over the edge of the "artboard" and see what happens. Au-oh! It says "page".

This is simply a case of Adobe wanting to call something simple like a page something more exotic like an artboard. It's a page. You can call it what you like... it's still just a page. Even Adobe calls it a page (sometimes). Same as "place." Adobe's definition of "place" is "import". It just sounds so much more "professional" to place something on an artboard than to "import file". I believe they do this to make graphic designers feel more important.
 

Attachments

  • AiPage2.jpg
    AiPage2.jpg
    28.7 KB · Views: 112
Last edited:

garisimo

New Member
Oh, here are couple more Illustrator dislikes:

• There is no single button or key command to center horiz. and vertical
• When using the Text tool -- I often have text in close proximity to objects on the layout -- when I hover over the text I want to edit, the SmartGuides highlight the text -- when I click the mouser to begin editing, 99% of the time it selects an object and converts it to a text path or text shape, obliterating the file, stroke, etc. AAAAGH!

-g-
 

signswi

New Member
I totally agree. This is a stupid argument. (you keep coming back though)

Hover your mouse over the edge of the "artboard" and see what happens. Au-oh! It says "page".

This is simply a case of Adobe wanting to call something simple like a page something more exotic like an artboard. It's a page. You can call it what you like... it's still just a page. Even Adobe calls it a page (sometimes). Same as "place." Adobe's definition of "place" is "import". It just sounds so much more "professional" to place something on an artboard than to "import file". I believe they do this to make graphic designers feel more important.

Looks like you caught an old bit of mouseover programming.

Place makes more sense than import but we've been over this in the thread already ;). Place is linked and non-destructive, import implies an embed. In any case...semantics. Weekend!
 

Custom_Grafx

New Member
Ai and Corel, need a tool for removing duplicate/overlapping lines.

I am sick of having to go into cad to fix things up these days.
 

Jillbeans

New Member
I did find the options for the envelope tool in X5 (they changed the icons, it's right in the toolbar)
Now I am having trouble with doing a custom gradient.
If doing a linear gradient, if I selected "custom" in the pop-up toolbox thing (how's that for vague?) you could select which color you wanted to put where, say a dark color at 0 then a mid tone at 50% then another dark color at 100%.
I can see the percentage scale but it is greyed out.
Oh I hate learning new things.
 

signmeup

New Member
Jill, just double click at the top of the coloured stripe that represents your gradient.(in the dialogue box) An arrow/triangle will appear along with un-graying your percent box. You can just slide the arrow or change the number in the box. You can also click the interactive fill button at the bottom of the tool bar and change them in the drawing space once you've added all the different colours. You'll also notice little squares of the colours along the upper tool bar and you can edit the colours there. (when using the interactive tool) Click the little adjusting square on the gradient to select which colour to adjust.
You can add colours to the gradient by double clicking the dashed line in the middle of the gradient that the little squares are on.
 

signmeup

New Member
Jill, just double click at the top of the coloured stripe that represents your gradient. An arrow/triangle will appear along with un-graying your percent box. You can just slide the arrow or change the number in the box. You can also click the interactive fill button at the bottom of the tool bar and change them in the drawing space once youve added all the different colours. You'll also notice little squares of the colours along the upper tool bar and you can edit the colours there. (when using the interactive tool) Click the little adjusting square on the gradient to select which colour to adjust.
You can add colours to the gradient by double clicking the dashed line in the middle of the gradient that the little squares are on.
Anyone care to explain how this is done in Illustrator? I can't figure it out. I can't even make a gradient.
 

WildWestDesigns

Active Member
I always just drag and drop the colors that I want to the gradient icon. Not the gradient tool that's on the left side, but the icon that's on the right side. When you have it over the gradient icon, that causes the flyout menu to open and then you just put that color where you want it on the gradient bar. Adjust the sliders as desired.
 

signmeup

New Member
I always just drag and drop the colors that I want to the gradient icon. Not the gradient tool that's on the left side, but the icon that's on the right side. When you have it over the gradient icon, that causes the flyout menu to open and then you just put that color where you want it on the gradient bar. Adjust the sliders as desired.
Thanks!
 

Bobby H

Arial Sucks.
Custom_Graphics said:
Ai and Corel, need a tool for removing duplicate/overlapping lines.

Illustrator and CorelDRAW both vary with what they can do in welding and cutting tasks.

Illustrator is pretty good at removing overlapping lines, such as a line stroke that has been "expanded" into an editable path. Select the object and use the "add" button in the pathfinder palette to get rid of the overlapping lines. Illustrator didn't have this capability several years ago, but added it at some point to compete with the "Remove Overlap" Xtra in Macromedia Freehand.

CorelDRAW can't really do the same thing, but Corel has some other unique capabilities in its welding/cutting tools. For instance a closed path can be used to cut through other closed paths or even open line segments. That's a handy capability for certain technical drawing tasks.
 

Custom_Grafx

New Member
Thanks Bobby, but I'm referring to overlapping lines that need to be made into one line.

You get vector files from people who generate dxf or eps or whatever, from 3d programs like rhino... when they flatten/squash the 3d, any overlapping lines are carried across to the 2d version. They don't always overlap perfectly either.

For print, this is a non problem.

For vinyl cutting, and laser cutting, it means the machine goes over it however many times the line is present. Not only does it take longer to cut the job, it affects quality when you have multiple passes on a cut line, be it vinyl cutting, or laser cutting.

Cad is the only program I am aware of (anyone please feel free to enlighten me/point me to a corel or Ai tool if it exists), that can detect overlapping lines (even if they are partial), and split up everything, then generate one line to replace it all.
 

Bobby H

Arial Sucks.
This is one of the fundamental problems or differences between how CAD programs draw objects and the way vector-based graphics programs that support Bezier curves do it.

AutoCAD prefers to draw objects like building elevations with lots of open line segments rather than closed paths. It also doesn't support Bezier based curves very well either. Curves are either arc-based or consist of many tiny straight line segments. This might be fine for building elevations that are drawn big on a plotter or output in wireframe for blue prints. It stinks for graphics.

When we receive a DWG or DXF file (or a PDF output from AutoCAD) we have a choice of either using the artwork as a guide to re-draw the art with closed paths or do other alternatives. In Illustrator, you can apply line strokes to the open path artwork, expand the strokes and then weld them together into what would be a closed shape. But you might still have a few messy details to edit. Another approach would be to rasterize it, do some Photoshop tricks to it and then print it. There's really no perfect solution.

Some sign making programs support both CAD-like line work as well as Bezier based curves. But it doesn't get around the fundamental problems of a DWG or DXF file with open line segments not being "vinyl cutter ready."
 
Top